How to set up the app
This guide is for the person who runs the company. Each step has a picture of what you will see on your phone.
If you prefer, Hugo explains everything to you in a call. For the people who do the cleaning, there is a shorter guide: pronto-apps.com/en/guide/team.
The full guide, always up to date: pronto-apps.com/en/guide
To get started, this is all you need
- On your phone, open app.pronto-apps.com and sign in with your email and the code you get.
- Accept the terms.
- The app shows you 4 short steps: your hourly rate, the invoice details, the first client and the first person in the team. Do them one by one. See the first steps
The rest of the guide is there for when you need it.
Sign in to the app
-
On your phone, open app.pronto-apps.com. On an Android phone, use Chrome.
-
Enter your email and click Get the code.
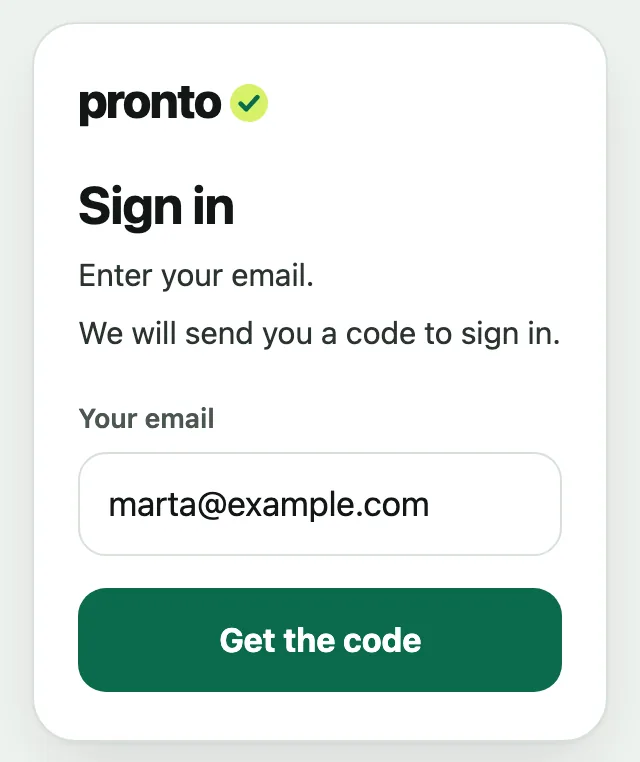
-
You get an email with a 6-digit code. The code is already in the subject of the email. Enter it in the app and click Sign in.
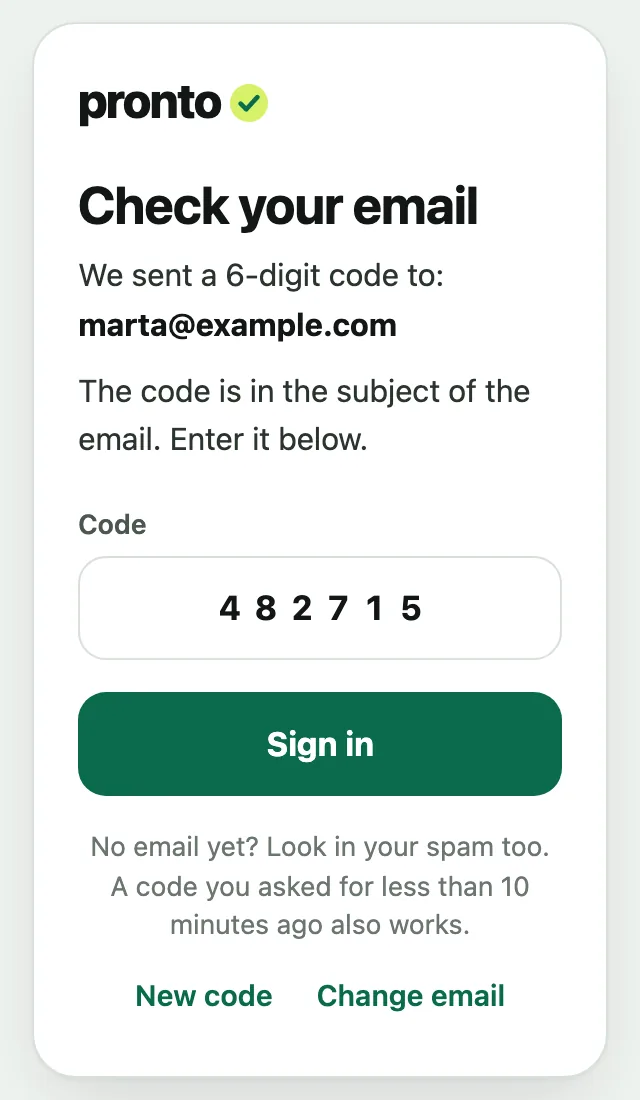
The code is valid for 10 minutes. If it does not arrive, look in your spam or click New code. A code you asked for less than 10 minutes ago also works.
-
The first time, the app shows your details: the company's name and yours, which you can correct right there, the email you signed in with and when the free trial ends. Tick I have read and accept the app's terms and the privacy policy and click Accept and start. Right after, you get a confirmation email, which is your proof. Your team can only use the app after this step.
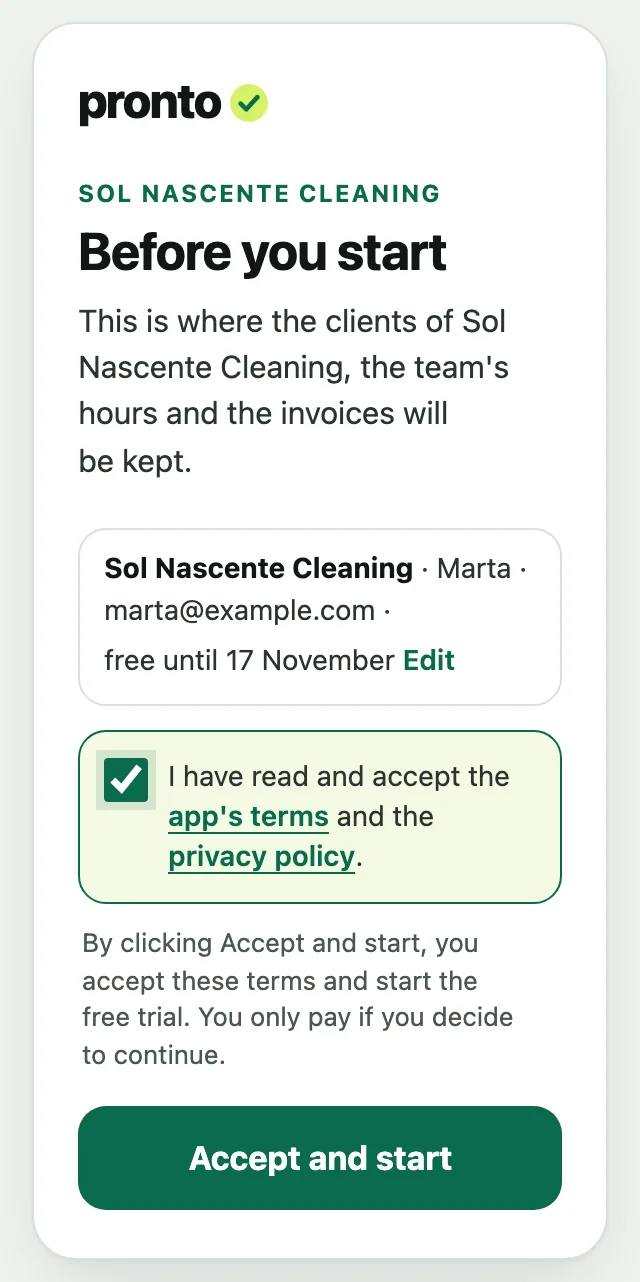
-
After that, the phone remembers you: you do not need a code every time you open the app. It only asks for one again if you sign out or if you do not open the app for 90 days.
The first steps
-
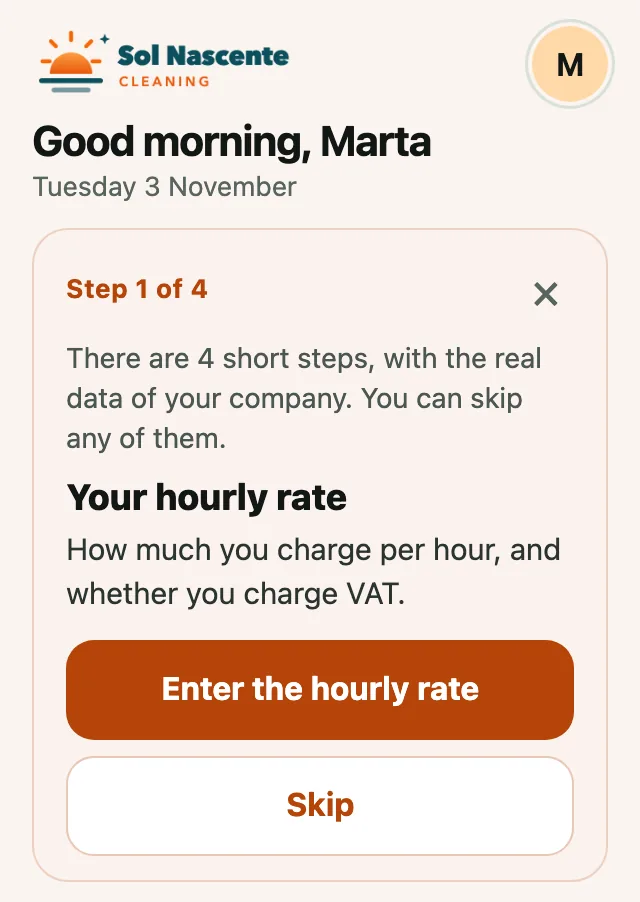
After the terms, the app shows the first steps in Today, one at a time: your hourly rate, the invoice details, the first client and the first person in the team. Use your company's real details.
-
Click the button in the step, for example Enter the hourly rate. The form opens, with grey examples in the fields. When you click Save, the app moves on to the next step.
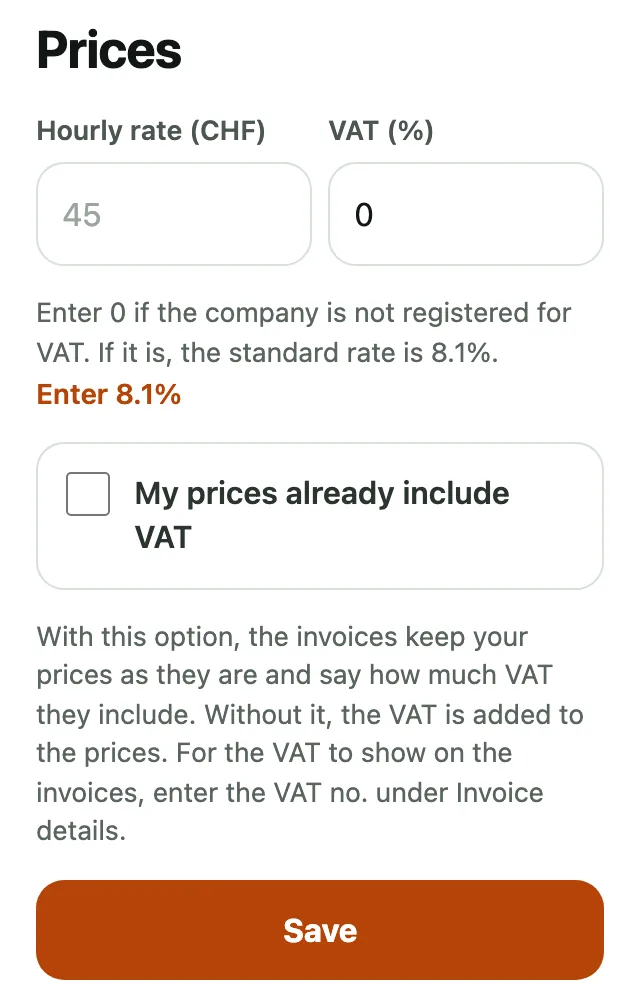
VAT is only charged if the company is registered for VAT. If it is, click Enter 8.1%, the standard rate for cleaning.
-
If you do not have the data to hand yet, click Skip. To see the step before again, click Back to the previous step. The × closes the steps.
-
At the end, click See the week or Done.
-
You can come back to these steps whenever you like: in Company, click See the first steps again. Each step is also explained further down in this guide.
If Hugo has already put your company's data in the app, these steps do not appear.
Your app
-
At the top you see the name and the logo of your company (marked in the picture), and the buttons have the colours of your brand. The invoices also have your logo.
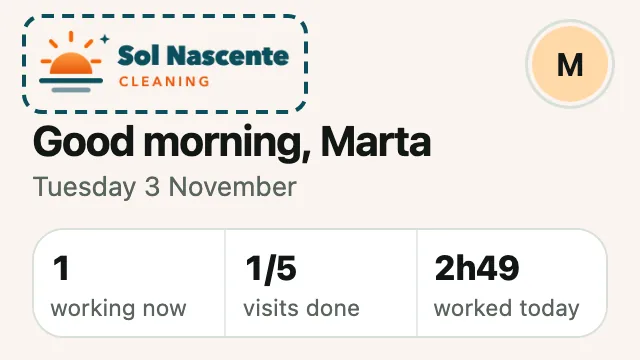
Hugo puts in the logo and the colours. If you want to change something, send him the logo by WhatsApp.
-
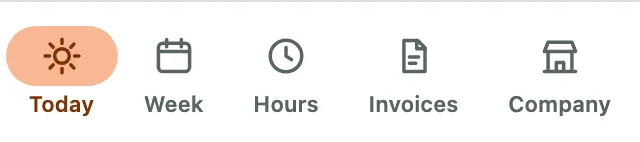
At the bottom are the tabs of the app: Today, Week, Hours, Invoices and Company. Click one to open it. On a computer, they are at the top, next to the logo (see On a computer).
-
The circle with your initial, at the top right, opens your profile: your name, your email, Install the app, the terms, help and the Sign out button.
On a computer
-
You can also use the app on a computer. Open app.pronto-apps.com in the browser and sign in with your email, as on your phone.
-
The parts of the app, Today, Week, Hours, Invoices and Company, are at the top, next to the logo, not at the bottom.
-
The screens use the whole width. The Week shows as a grid, the Hours as a table and, in Invoices, you see the list and the invoice side by side. When you open a client, a job or hours, the form opens in a panel on the right, with the app still visible behind it.
On a computer, where your phone shows Share the PDF, you see Download the PDF.
The app on your home screen
This way you open the app with one click, like the other apps on your phone.
Android
-
Open app.pronto-apps.com in Chrome. On a Samsung, use Chrome too, and not the Samsung browser.
-
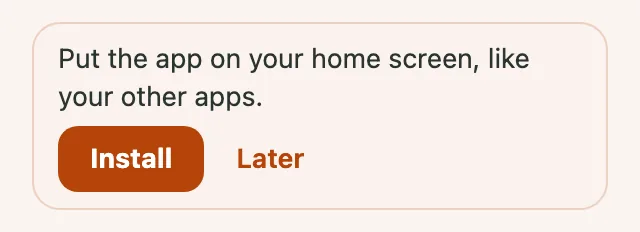
When this message appears in Today, click Install. Leave the page open until Installing the app changes to The app is installed.
-
If the message does not appear, click the Chrome menu, the three dots ⋮ at the top right, and then Install app or Add to Home screen. You can also click your initial, at the top right, and then Install the app: this is also how you put it back on the home screen, if you removed it.
On some phones, such as Xiaomi phones, you have to allow Chrome to create shortcuts on the home screen. If the icon does not appear, check this in the phone's settings.
-
Open the app from the new icon. On an Android phone, you are signed in without a code.
iPhone
-
Open app.pronto-apps.com in Safari.
-
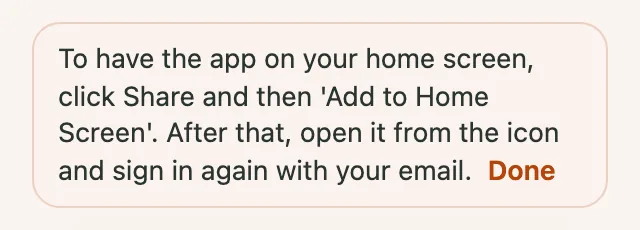
Click Share (the square with the arrow pointing up) and then Add to Home Screen. The app reminds you with this message:
-
Open the app from the new icon and sign in again with your email and the code. On an iPhone, the app on the home screen is kept separate from Safari, so you need to sign in once more.
The clients
-
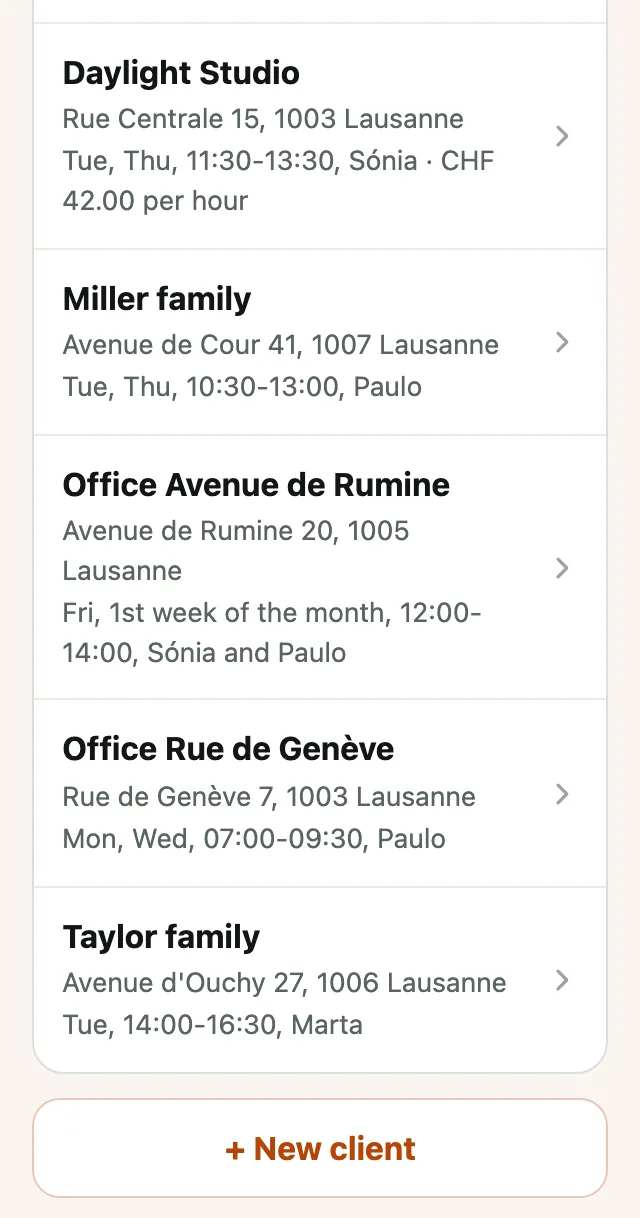
Click Company. Below the list of Clients, click + New client.
With more than 8 clients, the list is collapsed: enter the name or the address in Search for a client, or click Show the 24 clients (with your number of clients). The same goes for the team, with more than 8 people.
-
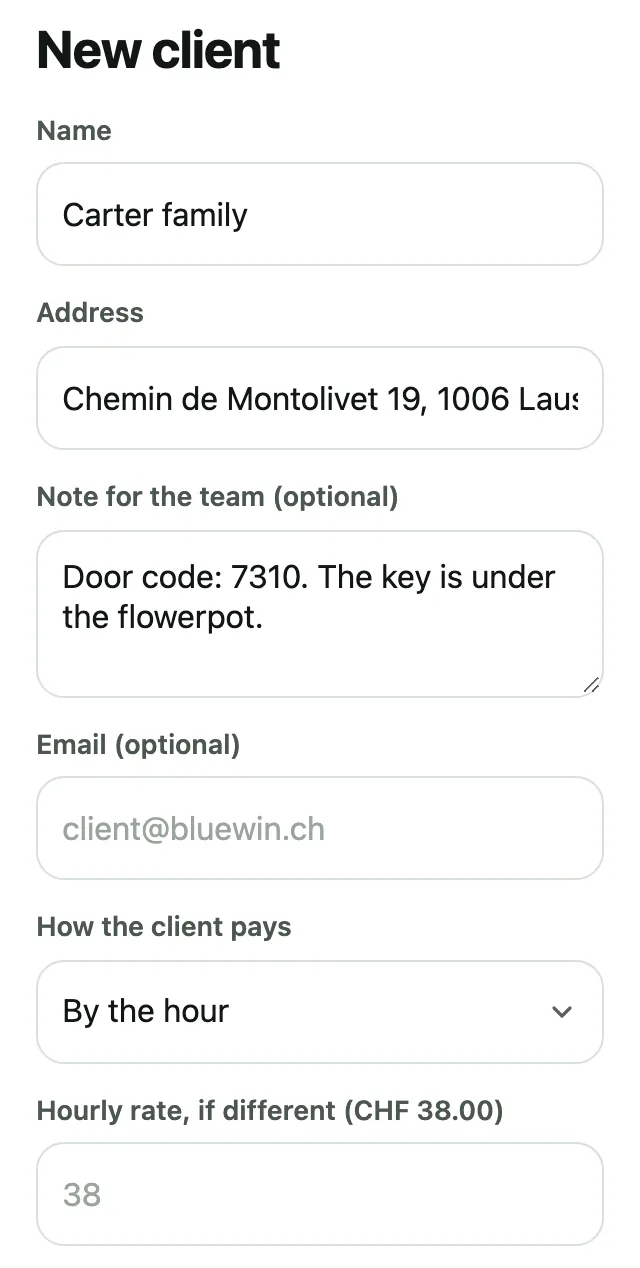
Enter the Name and the Address. With the full address (street, number, postcode and town), the team can see the route on the map and the invoice has the right address.
-
In Note for the team, write what the team needs to know, such as the door code or where the key is.
-
In Email (optional), you can enter the client's email address. It stays in the client's details and, if you have the Automatic invoices by email extra, that is where this client's invoices go.
-
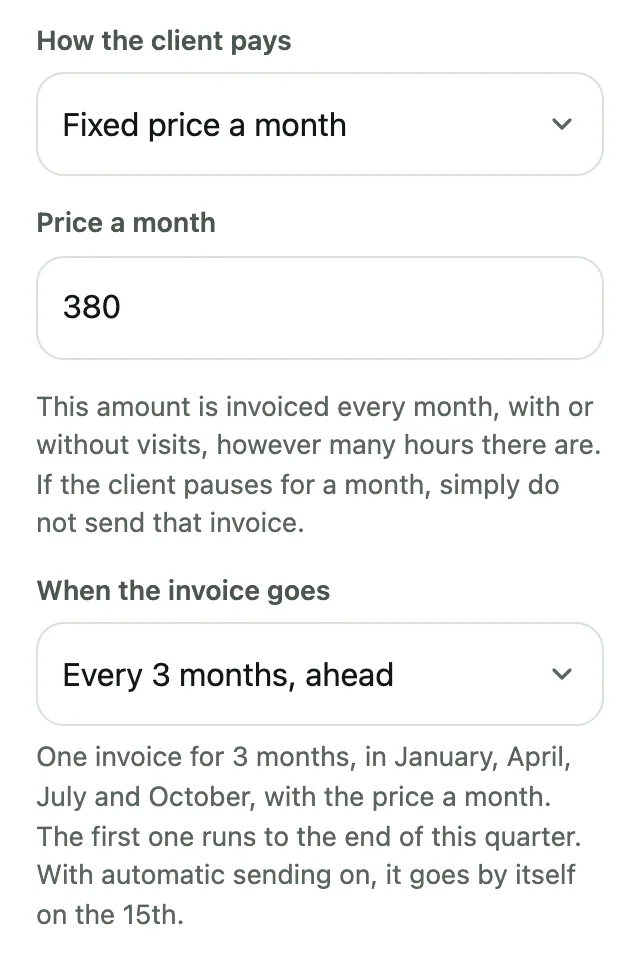
In How the client pays, choose By the hour, Fixed price a month (invoiced every month, however many hours) or By quote (a fixed price, invoiced once). The team's hours are still recorded.
With Fixed price a month, also choose When the invoice goes: At month end, like the others, On the 15th of the month itself, Every 3 months, ahead or Once a year, ahead. Below it, the app says what the first invoice will cover.
-
If this client pays a different hourly rate, enter it in Hourly rate, if different. If not, leave it empty: the company's rate applies. If your company charges VAT, the app says right there whether the price is without VAT or VAT included, as you chose in Company, under Prices.
-
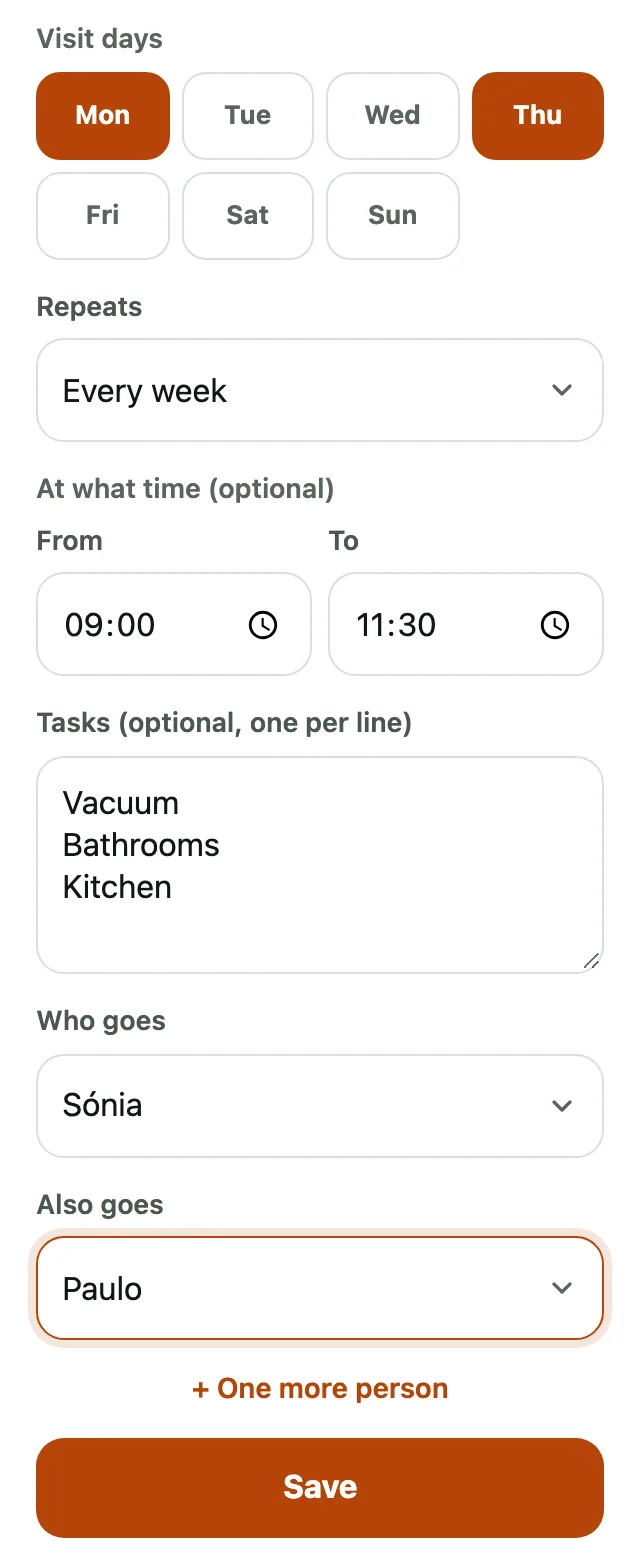
Choose the Visit days. In Repeats, Every week is already chosen. You can also choose Every 2 weeks, every 3 or every 4 weeks: then also choose the week it starts, and the app says when the next visit is. If you like, enter the time in At what time. In Tasks, write one task per line. In Who goes, choose the person, or the team if you already have teams (see The team). If two people go, click + One more person and choose the other one in Also goes. Click Save.
-
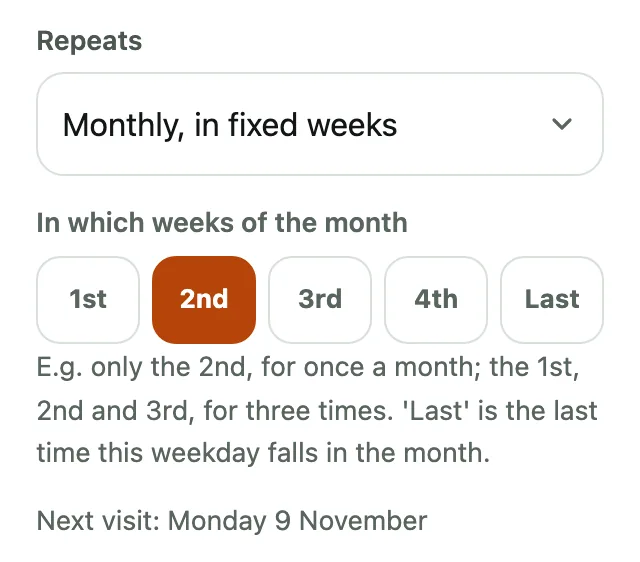
A client who only wants a visit in certain weeks of the month: in Repeats, choose Monthly, in fixed weeks and choose the weeks in In which weeks of the month. For example, only the 2nd for once a month, or the 1st, 2nd and 3rd for three times. Last is the last of those weekdays in the month, for example the last Friday. In the list of clients you see, for example, Fri, 1st week of the month.
-
To change a client, click the client's name in the list. If you no longer clean for a client, open the client and click Archive. The client's hours stay saved.
The company's hourly rate and the VAT are in Company, under Prices.
Different times on each day
A client can have one time on weekdays and another at the weekend, without entering them twice.
In Company, open the client's sheet and choose the days under Visit days.
Under the time, tick Different times on each day (it shows with two days or more). Each day chosen gets its own From and To, filled with the time that was there.
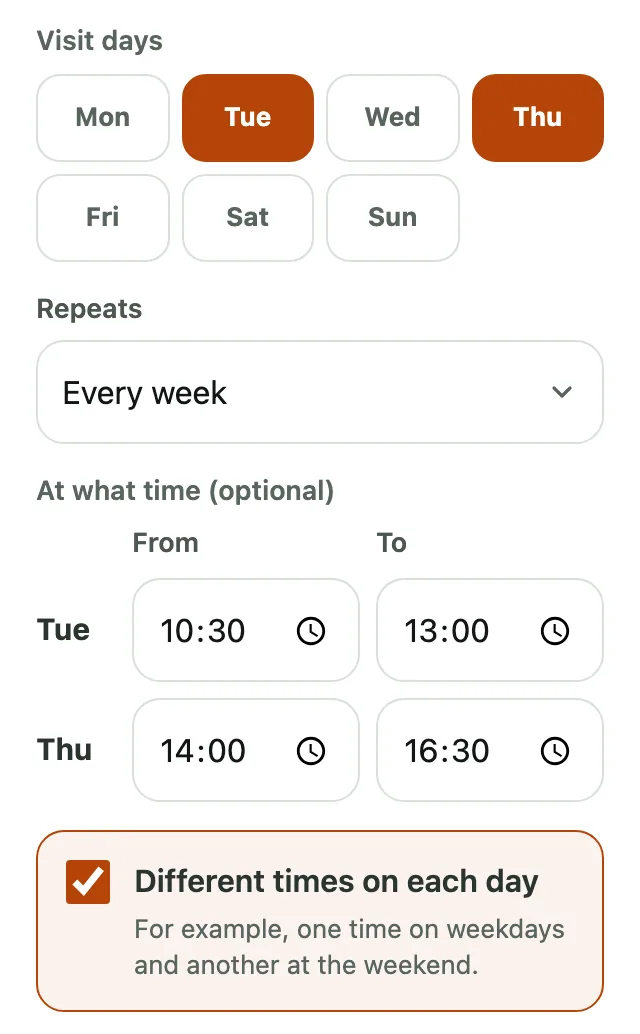
Change each day's time and click Save. Week, Today, the team's screens and the automatic planning use that day's time. Unticked, there is one time again, the first day's.
Customer number
Each client can have a number, to find them faster and to show it on the invoice.
In the client's sheet, write the number under Customer number (optional). Digits only, and never the same as another client's.
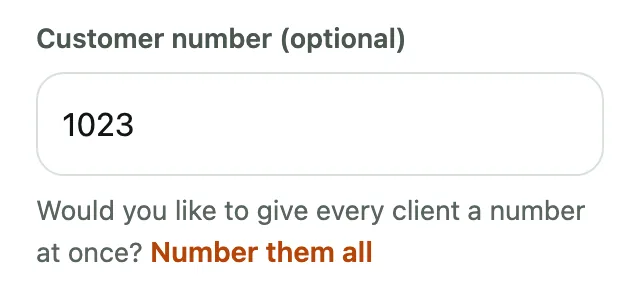
The number shows before the name in the client list, in Company, and in the client picker when you add a visit. In the list's search, search by the number.
Invoices made from then on show Customer number, with the number of the client who pays. Invoices already made stay as they were.
To number them all at once, click Number them all (in the sheet, while no client has a number yet) or Number the clients without a number (under the list). Clients without a number get consecutive numbers, in alphabetical order, from the number you choose. Numbers already there stay.
One-day clients
-
For a job that happens only once, like an end-of-tenancy clean or one after a move, you don't need a client with fixed days. In Week, click + Add next to the right day.
-
In Client, choose a client you already have or + New client, and write the New client's name and New client's address. Choose who goes and the time, and save.
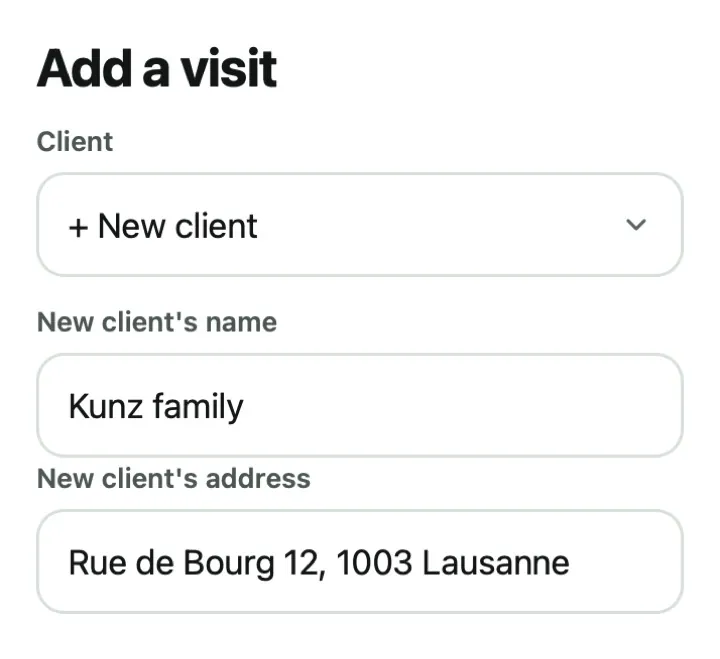
-
The client then appears in the list in Company with No fixed days, and the invoice goes at month end, like the others. If they ask again, add another visit on another day.
A client who pays for several work sites
When a company or a property manager pays for cleaning at several places, the client is the one who pays, and each place is one of their work sites.
Open the sheet of the client who pays and click + Add a work site. A new site's sheet opens, already linked to them. Enter the name, address, days, times and who goes, as for any client.
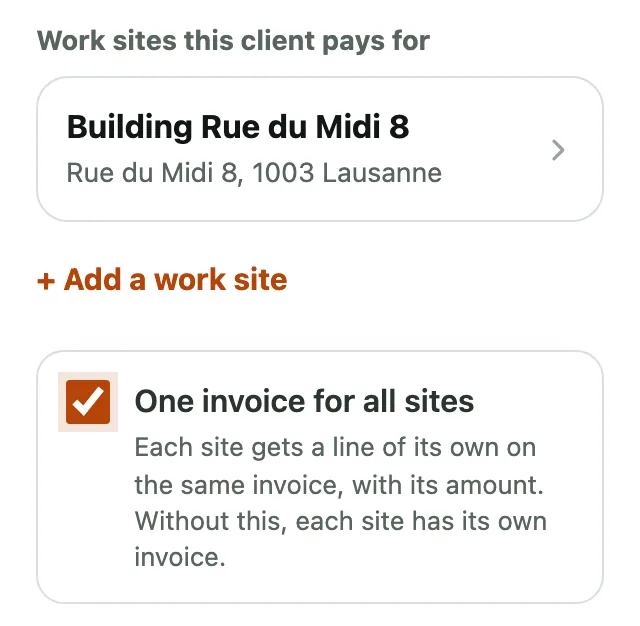
The sheet of the client who pays lists their work sites; click one to open it. Each site's sheet says Work site of and the name of the client who pays.
The plan shows only the work sites, under their own names. The client who pays, with no days of their own, never shows in Week, Today or the team's screens.
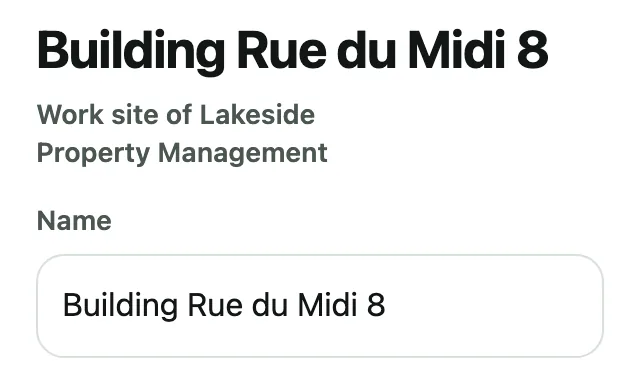
A site without its own price uses the hourly rate of the client who pays. Invoices go to the name and address of the client who pays and say which site they are for. For one invoice with a line per site, tick One invoice for all sites in the sheet of the client who pays.
The invoice's text and invoices by post
-
In the client's profile, in Text on the invoice (optional), write what should appear on each of this client's invoices, up to 8 lines. For example, the job and the site.
-
If the client has no email, tick The invoice goes by post. Their invoice never goes by email and joins the others to print (see each client's invoice).
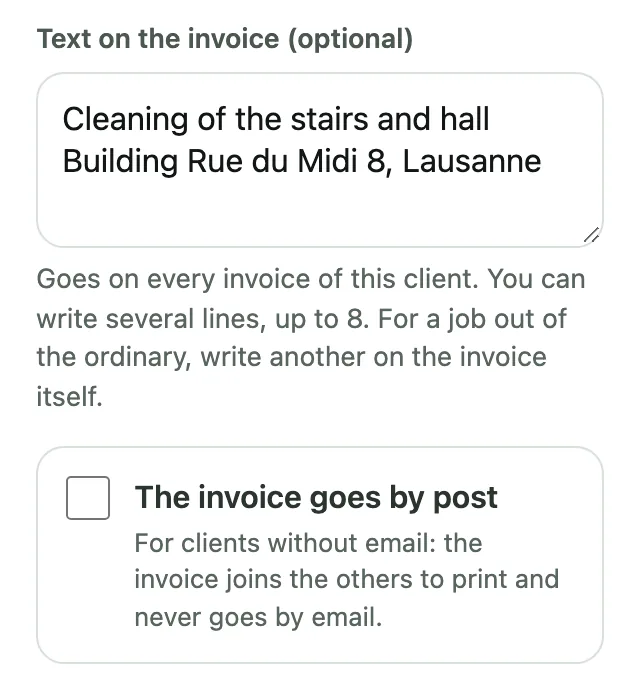
The team
-
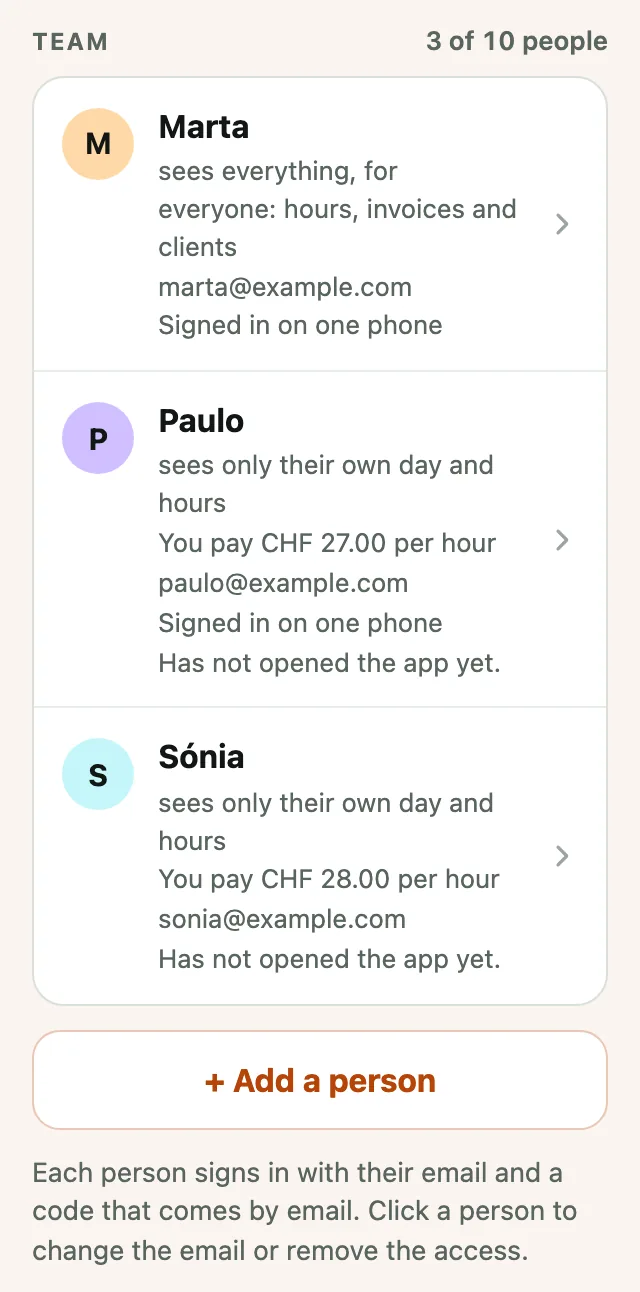
In Company, under Team, click + Add a person.
-
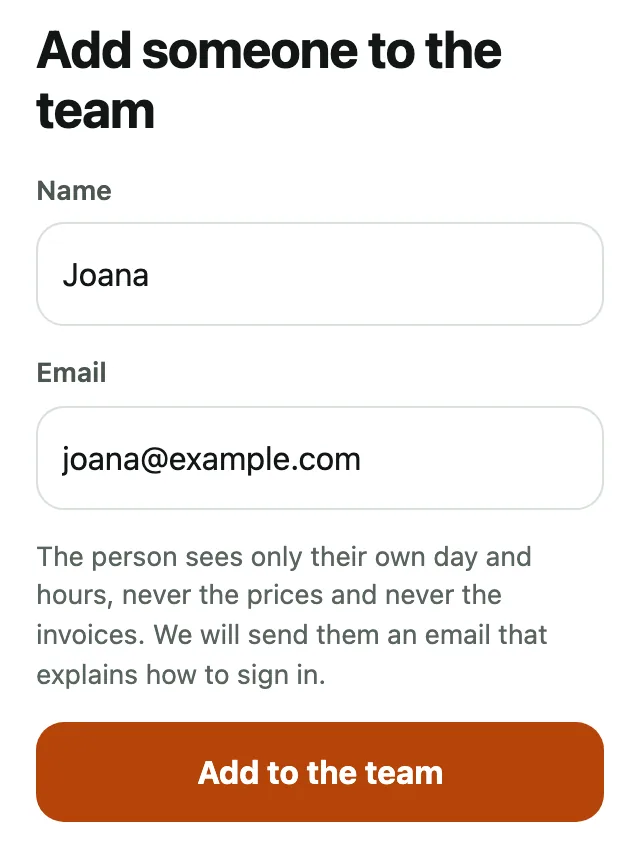
Enter the person's name and email and click Add to the team.
-
The person gets an email that explains how to sign in: they open app.pronto-apps.com and enter their email and the code they get. You can send them the same by WhatsApp, with Send by WhatsApp too, and include the link to the team's guide: pronto-apps.com/en/guide/team.
-
Click a person's name to open their access. In Hourly pay, in CHF, enter the amount and click Save the hourly pay. Only you can see this amount, the team never sees it.
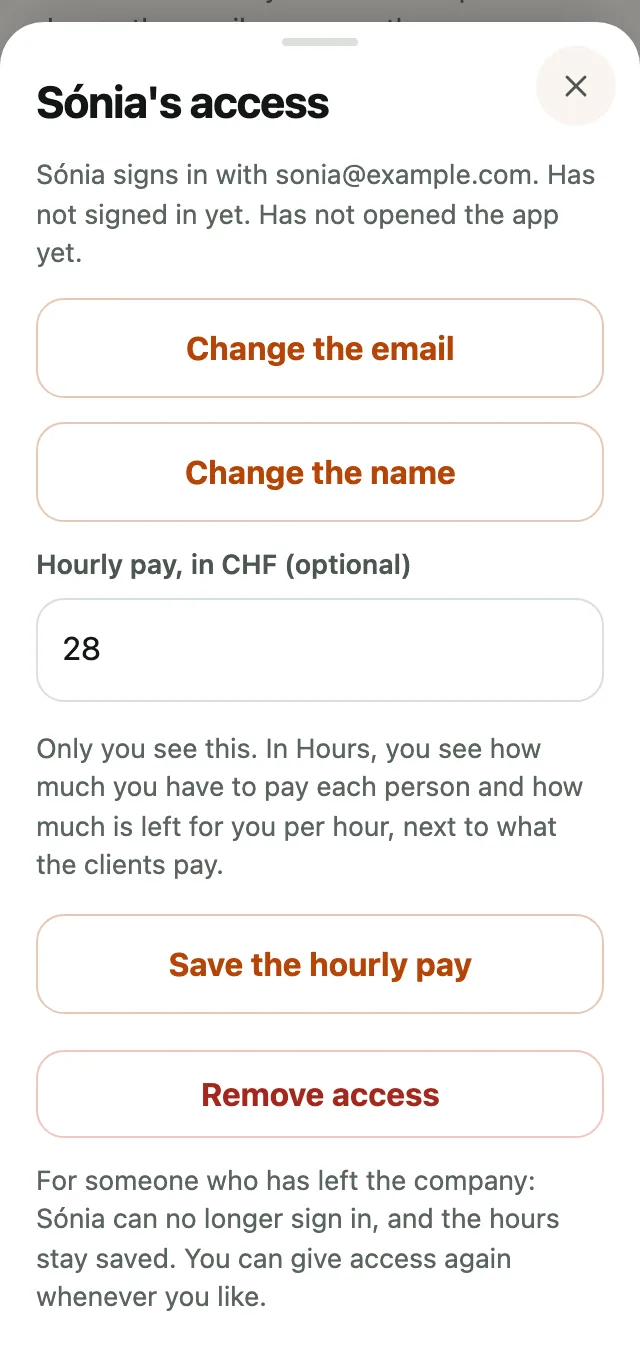
Here you also change the person's email or name. If someone leaves the company, click Remove access: that person can no longer sign in, and their hours stay saved.
-
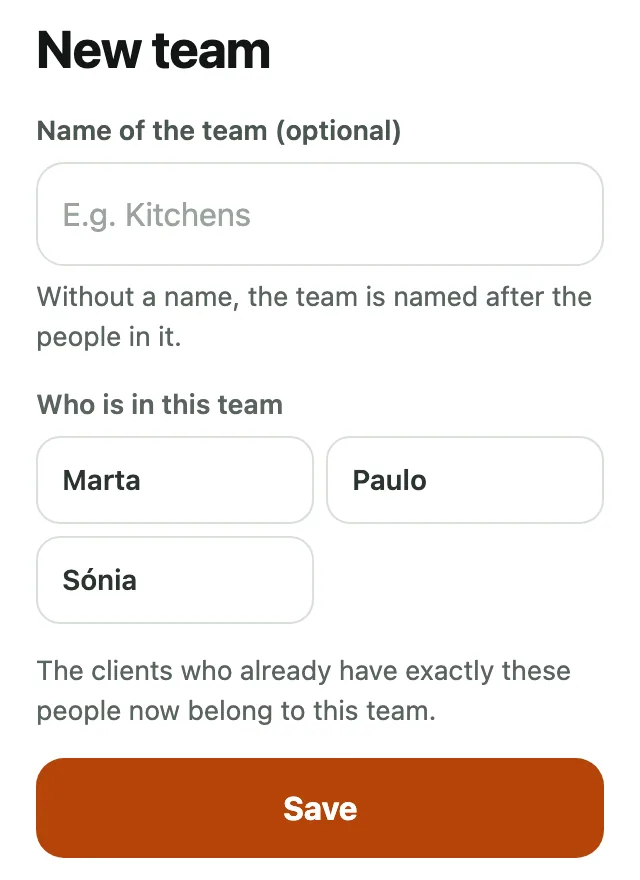
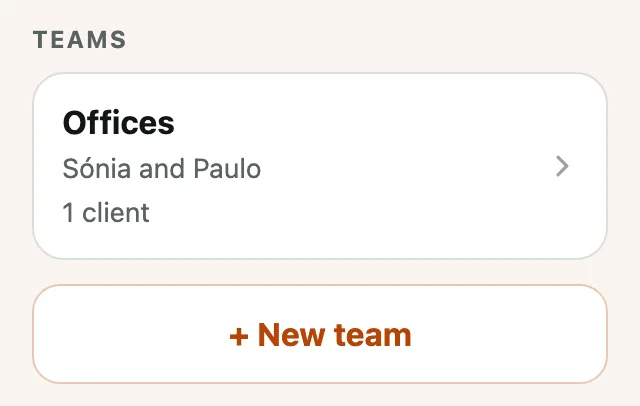
People who usually work together can form a team. In Company, under Teams, click + New team. If you like, give it a name, such as 'Kitchens'. Choose who is in it and click Save. Without a name, the team is named after the people in it.
-
In Teams you see each team, who is in it and how many clients it has. If some people already go to several clients together, the app shows them under Suggestions from the app: click Save as a team. The Teams part only appears with two people or more.
-
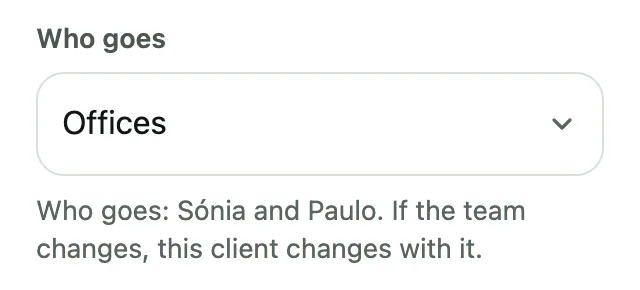
In a client's details, under Who goes, the teams come first and then the people. Choose the team and the app says who goes. If you swap someone in the team, the change applies to all of that team's clients.
-
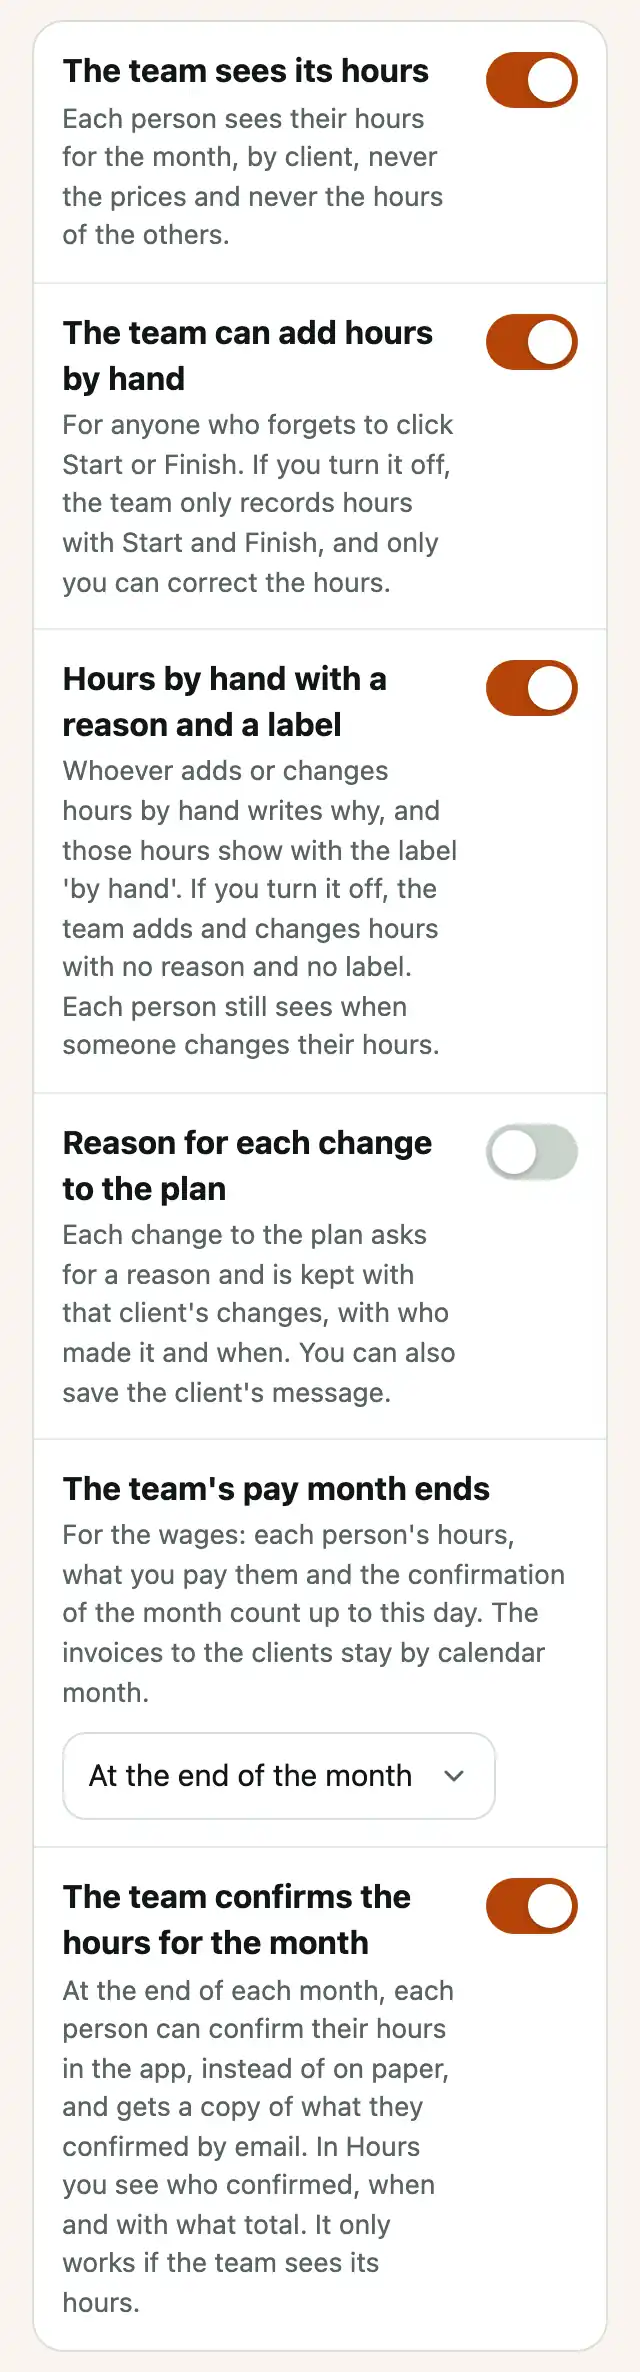
In Company, under Settings for the team, you will find the team's switches. With The team sees its hours turned on, each person sees their hours for the month, never the prices and never the hours of the others. Click the switch to turn it off or on again.
-
With The team can add hours by hand turned on, someone who forgot to record their hours can add them. It starts turned on. If you turn it off, the team only records hours with Start and Finish, and only you can correct the hours.
-
With Hours by hand with a reason and a label turned on, whoever adds or changes hours by hand has to write why, and those hours show with the label by hand. It starts turned on. If you turn it off, the team adds and changes hours without writing the reason, the label no longer shows and the button only says + Add hours. Each person still sees when the company changes their hours.
-
With The team confirms the hours for the month turned on, each person confirms their hours in the app at the end of the month, and gets a copy of what they confirmed by email. It starts turned on. It only works if the team sees its hours.
-
With Reason for each change to the plan turned on, each change to the plan needs a reason and is kept in that client's changes, with who made it and when. You can also paste the message of the client who asked for the change. It starts turned off.
-
In The team's pay month ends, choose up to which day the hours count for the wages: At the end of the month (the default) or a day from the 1st to the 28th. With the 25th, for example, the team's pay month for November goes from 26 October to 25 November: each person's hours, what you pay them and the confirmation of the month count this way. The invoices to the clients stay by calendar month.
Supplements and public holidays
-
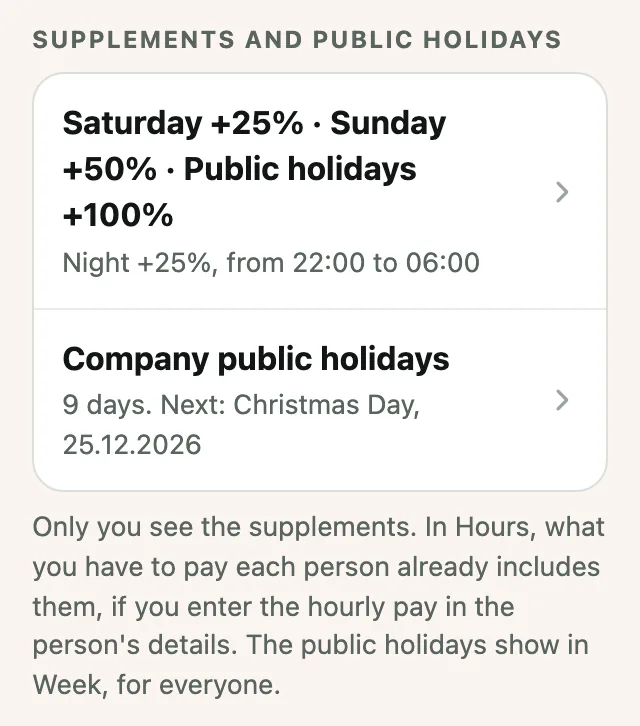
If you pay more on Saturdays, on Sundays, on public holidays or at night, enter it in the app. In Company, under Supplements and public holidays, click the first line (at the start it says No supplements for the team).
-
Enter how much more you pay, as a percentage of each person's hourly pay. Leave 0 where you pay no supplement. For the night, also choose at what time it starts and ends. Click Save the supplements.
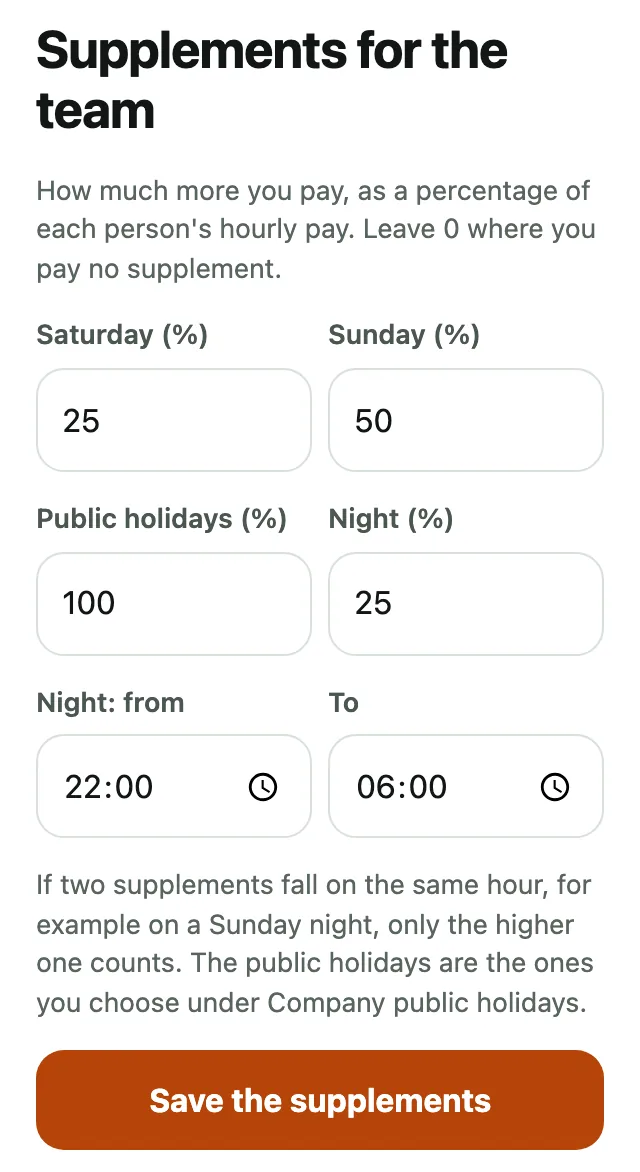
If two supplements fall on the same hour, for example on a Sunday night, only the higher one counts. Only you can see the supplements, the team never sees them. In Hours, what you have to pay each person already includes them (see The hours).
-
To choose the public holidays, click Company public holidays. The first time, the most common public holidays are already ticked. Tick or untick the ones for your company.
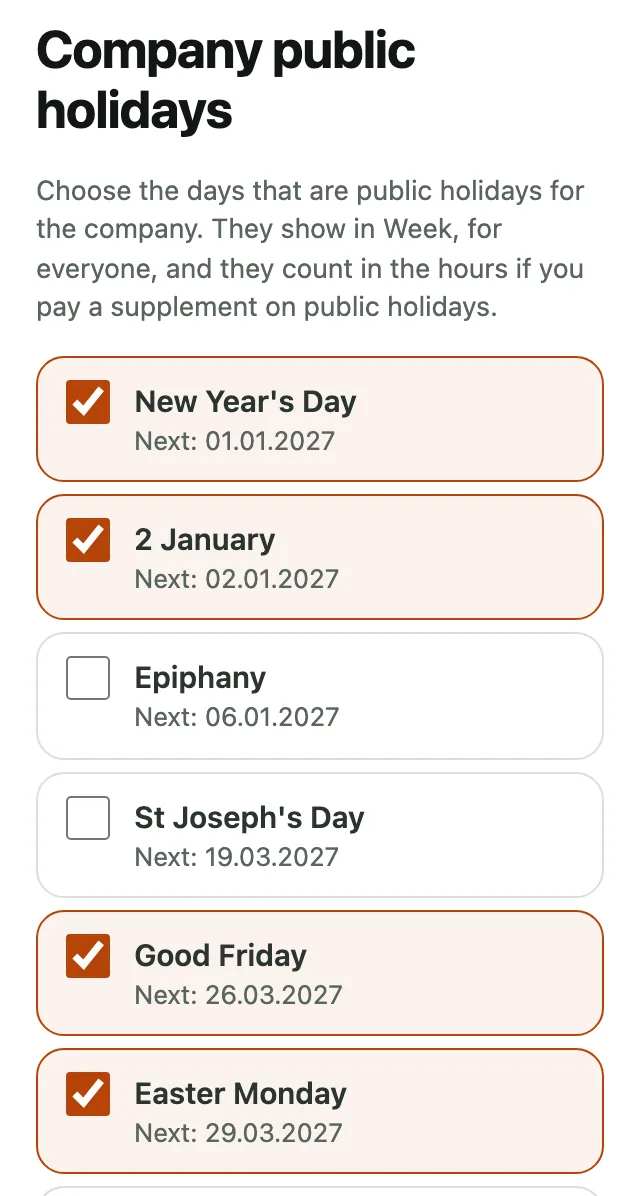
-
If the company has another day off every year, choose the day and the month in Another day, every year and click Add this day. At the end, click Save public holidays.
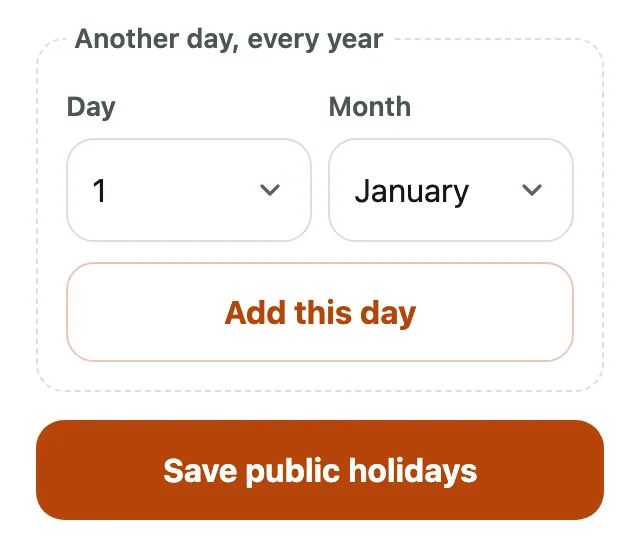
The public holidays show in everyone's Week, in purple and with their name. If you pay a supplement on public holidays, the hours on those days count with the supplement.
The week
-
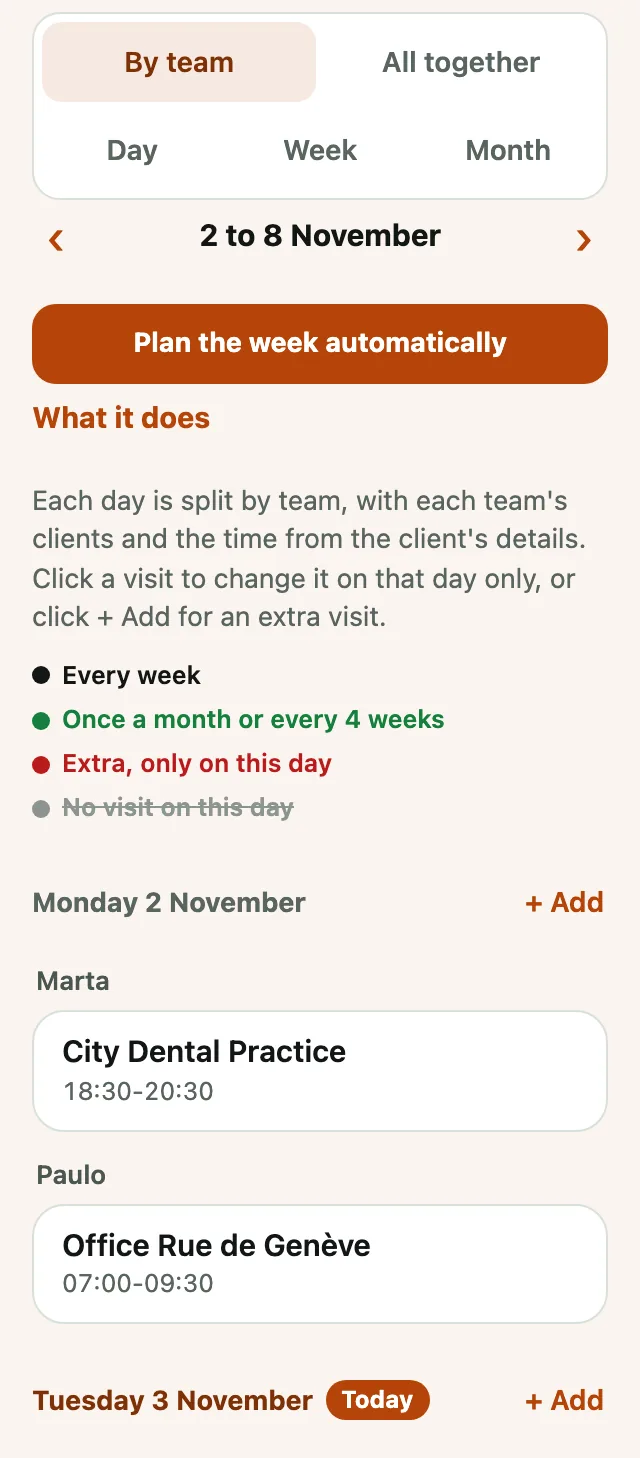
Click Week. The regular visits appear automatically, each client on their days, with the time and the person you put in the client's details. Each day is split by team: the name of the team, or of the person who goes, is above, and the clients are below. With the arrows ‹ and › you change week.
-
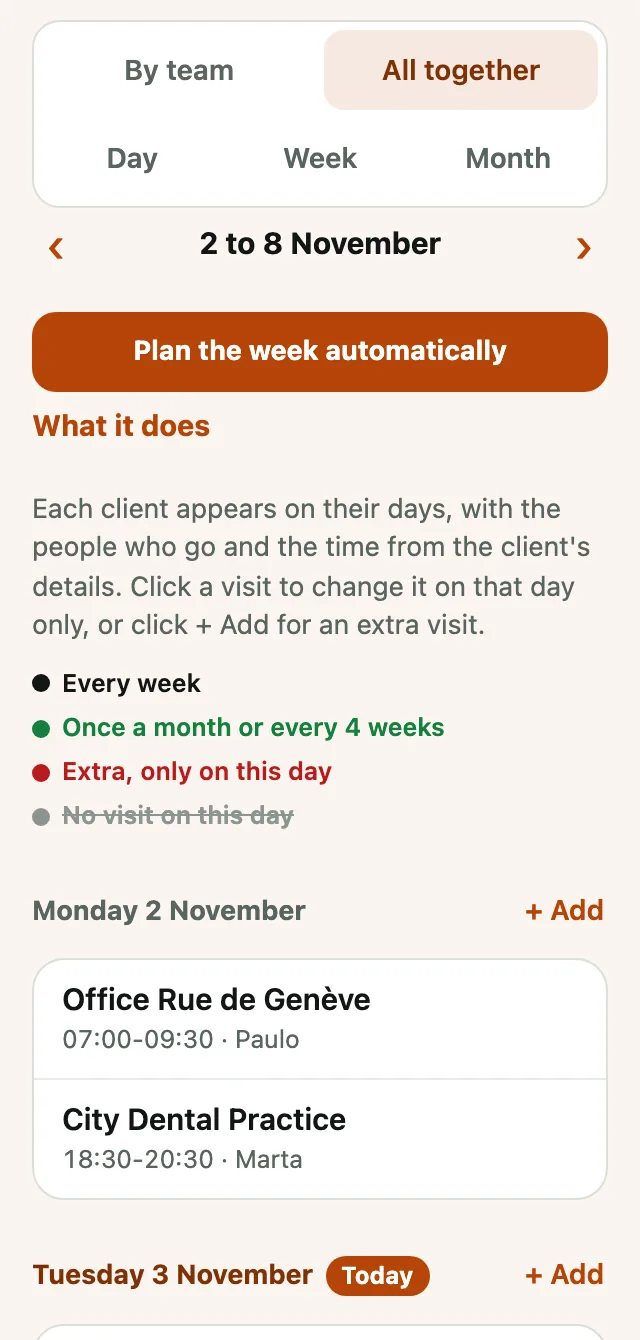
The colour of the client's name shows how often you go there. Black, every week. Orange, every 2 or 3 weeks. Green, once a month or every 4 weeks. Red, an extra visit, only on that day. Grey and crossed out, no visit on that day. Above the days, the key shows only the colours that appear.
Today's date is marked Today. Saturdays, Sundays and the company's public holidays show in purple, so you spot them straight away. Each public holiday shows its name next to the day. You choose the public holidays in Company (see Supplements and public holidays).
-
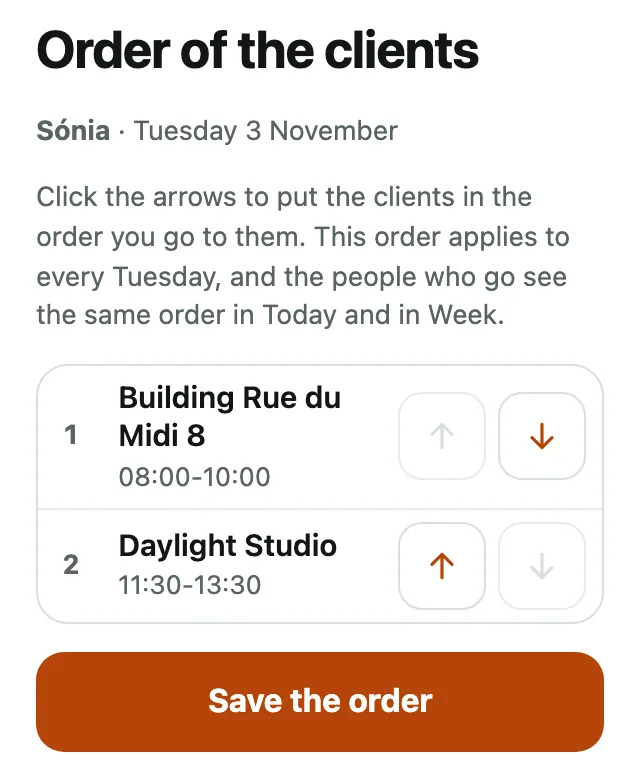
When the same team or person has two clients or more on the same day, Change the order appears next to the name. Click it, put the clients in the order you go to them, with the arrows, and click Save the order. The order applies to that weekday, every week, and the people who go see the clients in that order in Today and in Week.
-
At the very top of the Week there are five buttons: By team (the default), All together, Day, Week and Month. In All together, each day is one list and each visit shows who goes. In Day you see the day's hours, with a column for each person, and in Week the seven days side by side, by the hour. On a phone, swipe sideways to see more people or more days. The app remembers your choice on that phone or computer. The Plan the week automatically button belongs to the Automatic planning extra: without the extra, it opens its page, with what it does and its price.
-
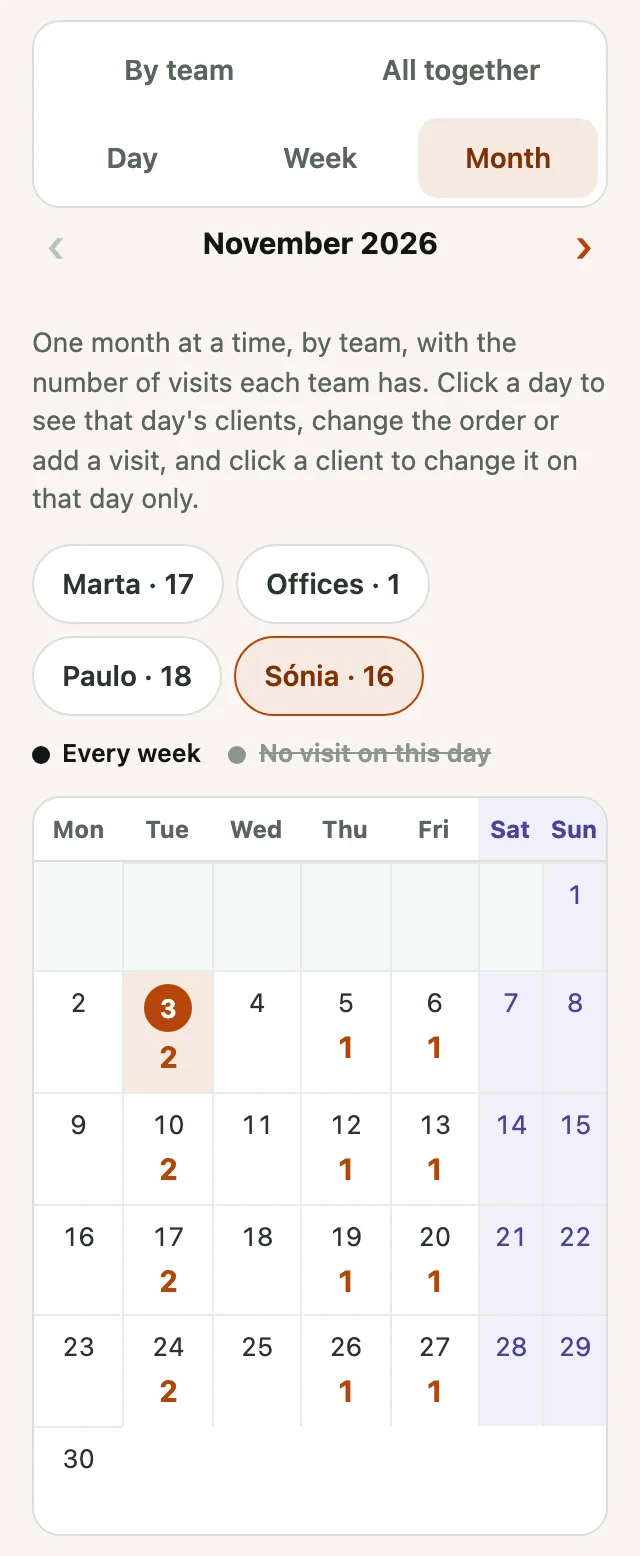
In Month you see one month at a time, one team at a time. Click the name of a team: next to it is the number of visits it has in that month. On the phone, each day shows how many visits there are. Today's date is in a circle, and Saturdays and Sundays are in purple. With the arrows ‹ and › you see this month and the next three.
-
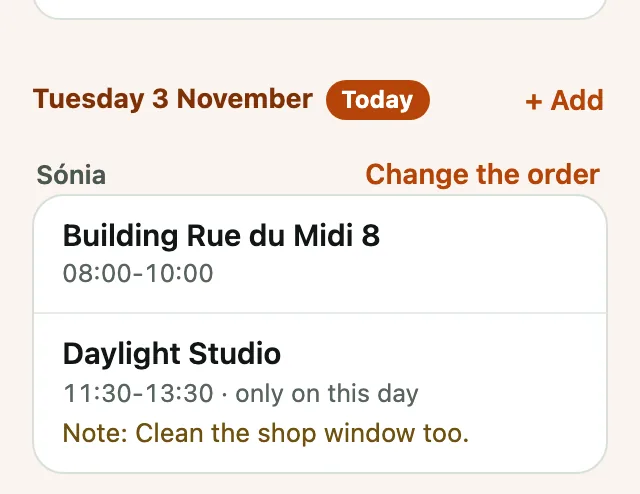
Click a day to see that day's clients, below the month. There you can change the order, add a visit with + Add or click a client to change it on that day only. On a computer, each day already shows the names of the clients, with the time and the note, and a click on the day opens that day's visits in a panel on the right.
-
To change a visit on one day only, click it. Choose another person in Who goes (or add one more, with + One more person), or another time, and click Save. The other weeks stay as they were.
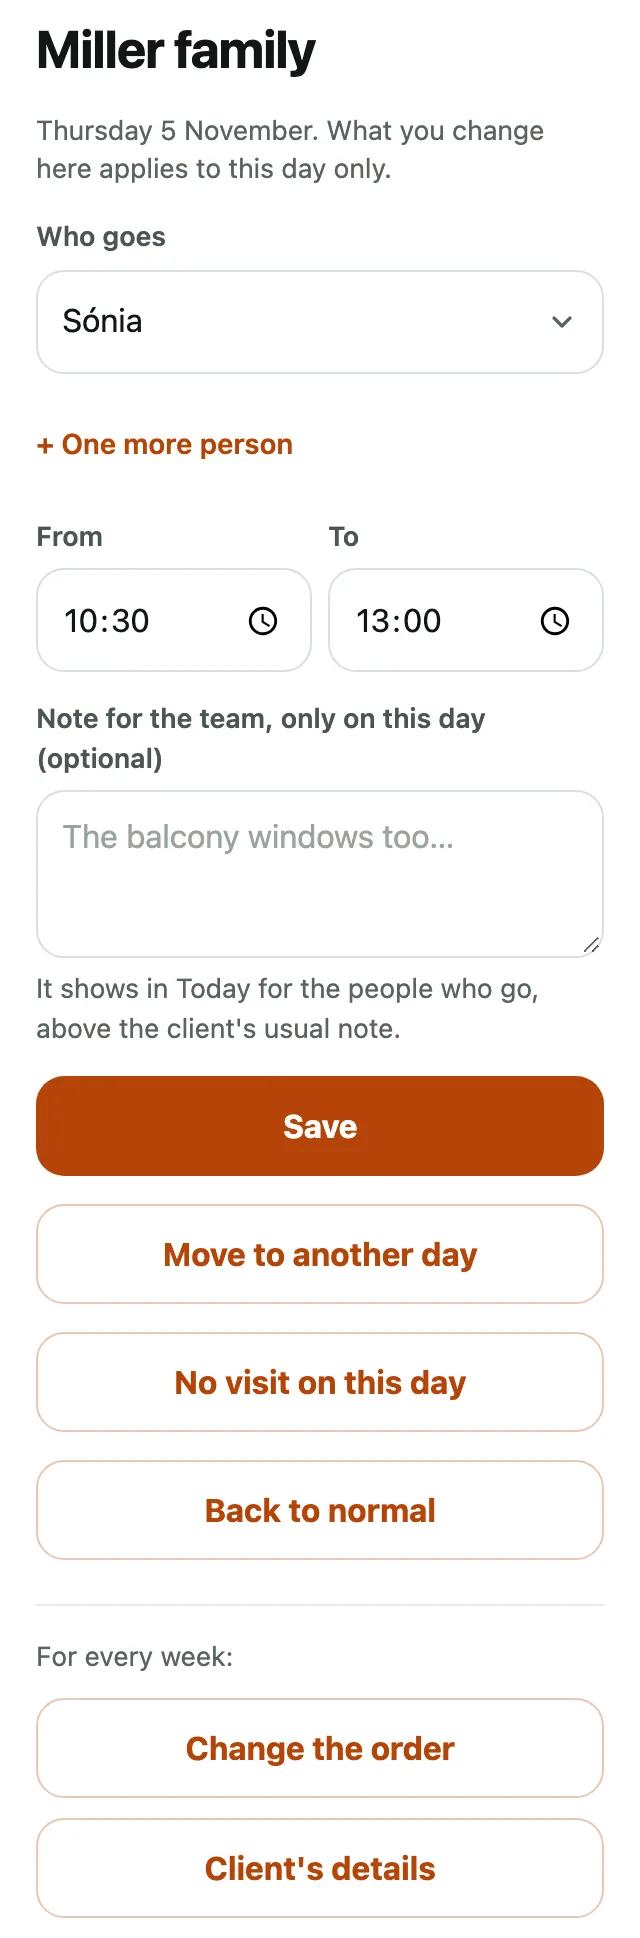
You can also leave a note for the team, only on that day, such as 'Clean the shop window too'. The person sees it in their Today, with Only today, above the client's usual note.
At the bottom, under For every week, are the things that apply beyond that day: Change the order, for the order of the clients on that weekday, and Client's details, to change the days, the time or who goes for good.
-
If the visit moves to another day, click Move to another day. Choose the day in the calendar (with ‹ and › you change month) and click Move to this day. The same people go, at the same time and with the same note. On the day it was planned for, the visit stays crossed out, with a note saying where it moved to.
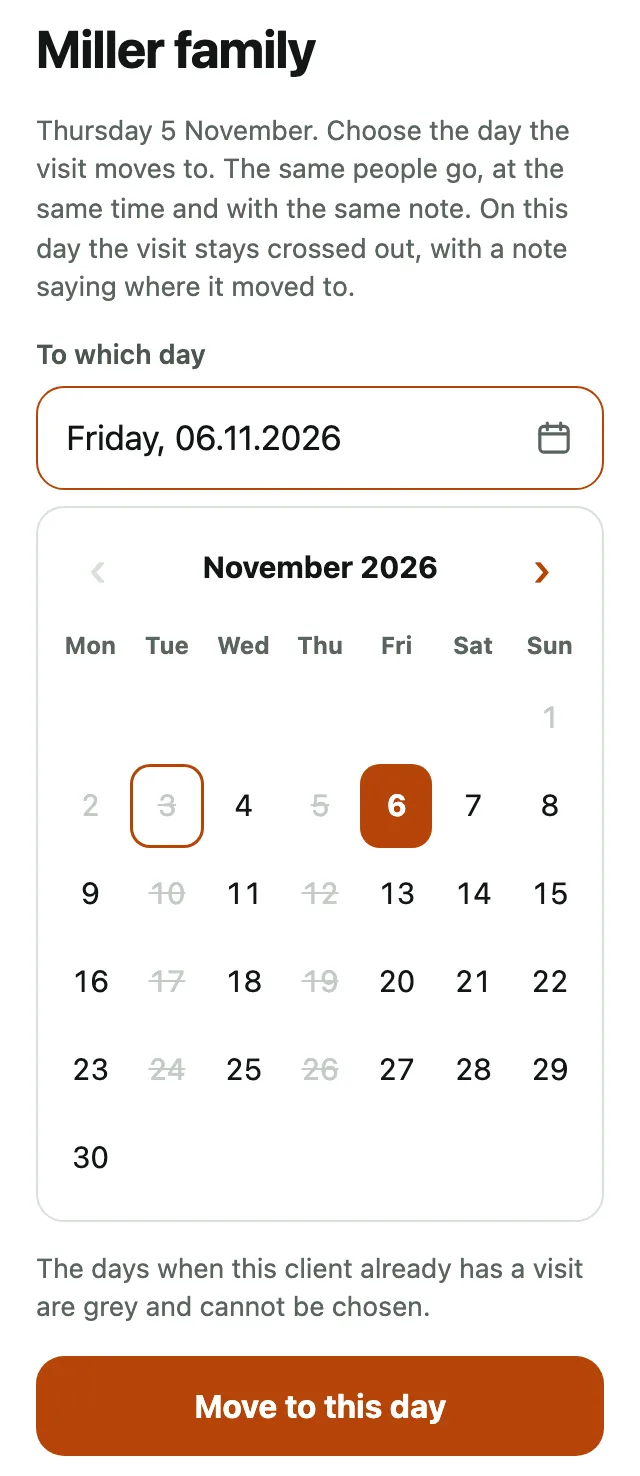
The days when the client already has a visit are grey and cannot be chosen.
-
If the visit does not happen on that day, click No visit on this day. If you like, write the reason, for example 'holiday', and click No visit on this day again. The reason shows in Week, for you and for the people who usually go.
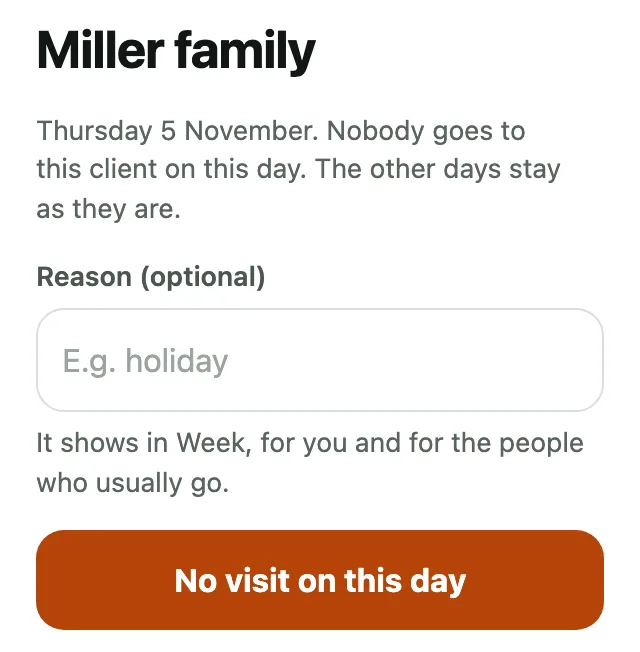
When a visit is already crossed out on that day, click it and then Write the reason or Change the reason. To undo a change, click Back to normal.
-
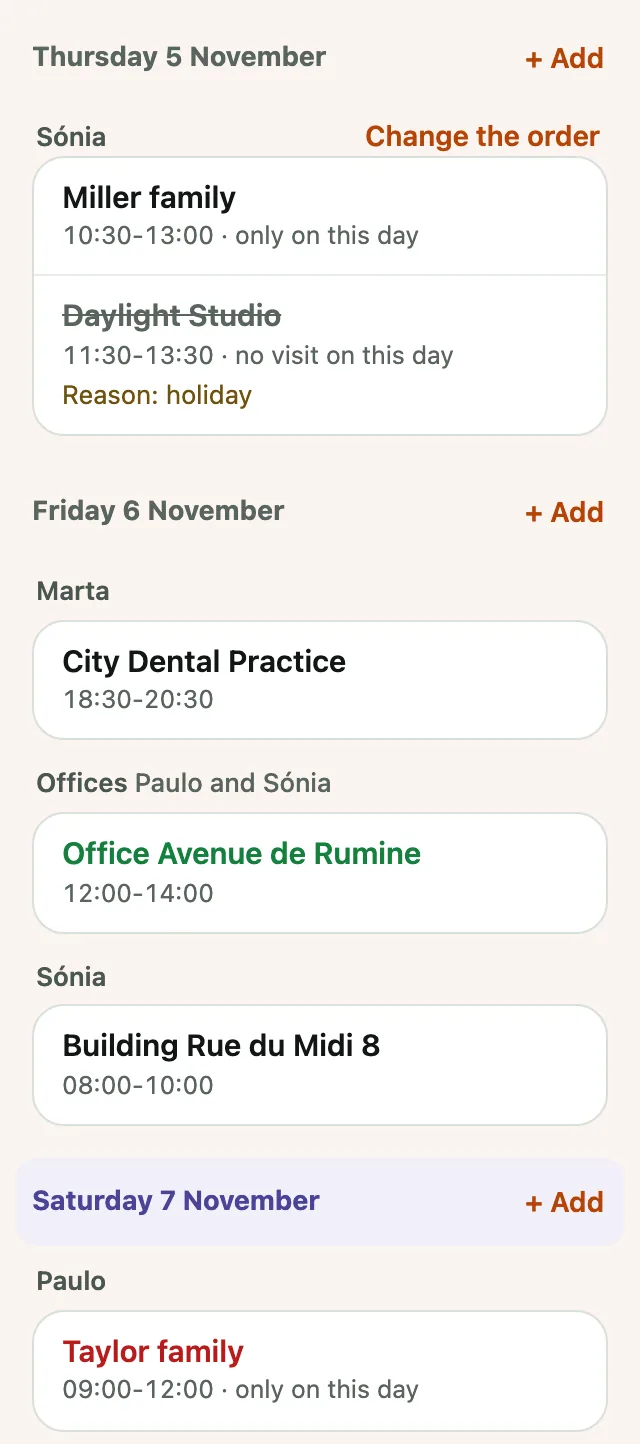
In the week, a change shows with only on this day, and the visit that does not happen stays crossed out, with the reason below.
-
An extra visit that a client asked for: click + Add next to the day. Choose the client, who goes and the time, and click Save.
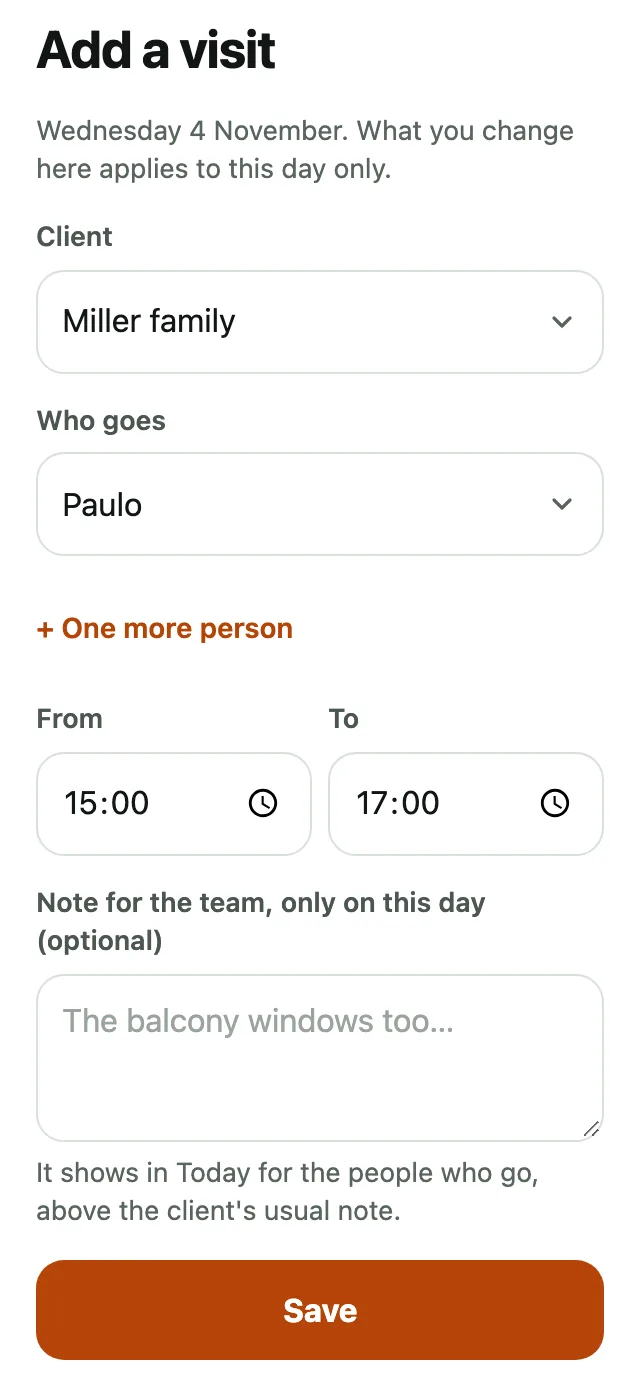
If it is a new client, choose + New client in Client and write their name and address (see One-day clients).
-
Each person in the team sees their week on their phone, with the changes already in it.
Copy a visit to another day
For an extra visit at the same client, for example the windows in two days, without touching the regular one.
In Week, click the visit, then Copy to another day.
Pick the day in the calendar. Days when the client already has a visit are grey. Who goes and the times come the same, and you can change them.
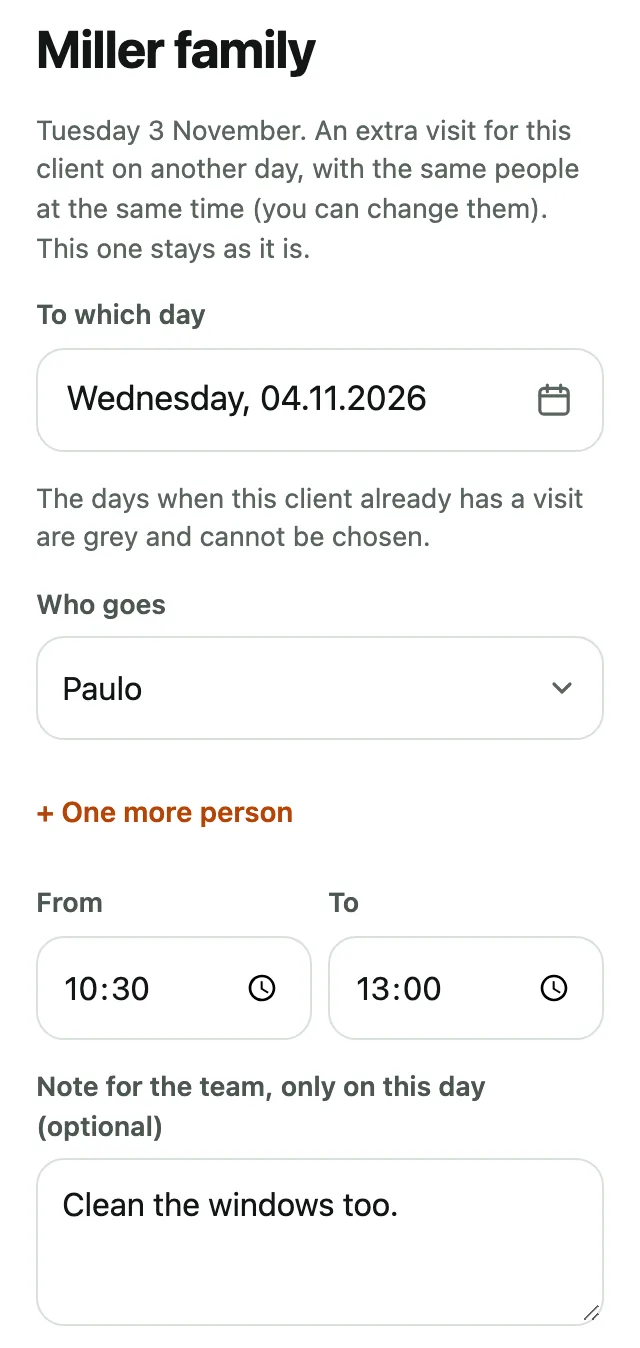
Write a note for that day if you like, and click Add on this day. The original visit stays as it is.
Undo the automatic planning
With the Automatic planning extra, you can go back after accepting a proposal.
After you accept the proposal from Plan the week automatically, the top of Week says how many swaps were accepted and when.
Click Undo and the plan goes back to how it was before the proposal. Visits you changed by hand after accepting stay as they are.
Click Keep if the proposal is right, and the note goes away.
Holidays and absences
With the holidays and absences extra, you enter who is on holiday, sick or on sick leave, and your team asks for holiday in the app.
-
In Company, under Holidays and absences, click + Add holiday or absence. Choose the person, the reason (Holiday, Sick, Sick leave or Absent), the first and the last day, and click Save. If you write a note, only that person sees it, apart from you.
-
On those days, that person's visits show in Week with a warning, for example Ana is on holiday, so that you can choose who goes in their place. Those days also appear on the sheet for your accountant.
-
Your team asks for holiday, or says they'll be away, in the app, in Week. While requests are waiting, a number shows on the Company tab, and each request shows at the top of Today and Week: who asked, the reason, the days and what the person wrote, with Accept and Decline right there. If the note is long, click it to read all of it.
-
In Week, the days asked for are striped until you answer, so you see them while you plan. In Company, the requests also show, right after the extras.
-
Click Accept and the request goes into the plan, as if you had entered it. Click Decline and the person sees in the app that it wasn't accepted.
The day
-
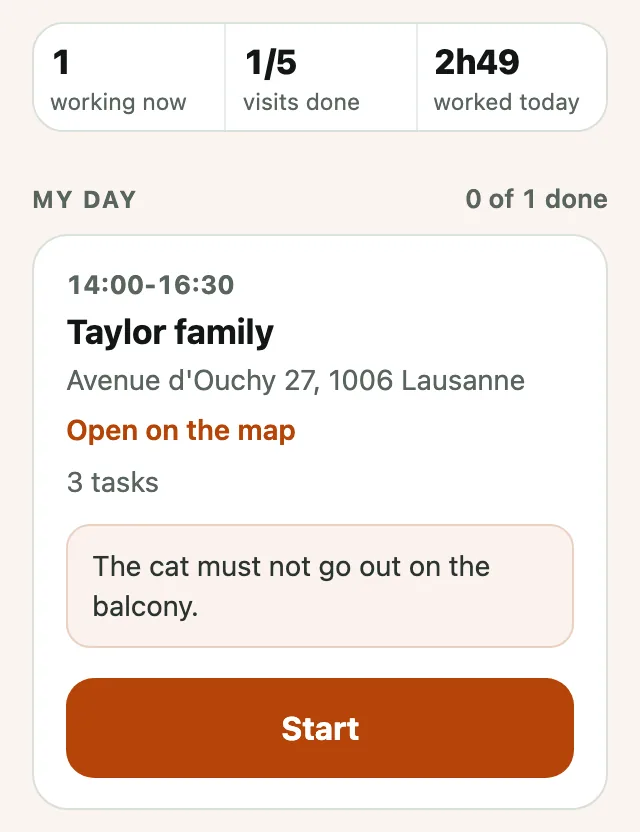
In Today you see, at the top, how many people are working now, how many of the day's visits are already done and the hours worked today.
-
If you do cleaning too, your visits are in My day. When you arrive at the client, click Start. When you leave, click Finish. The team does the same.
-
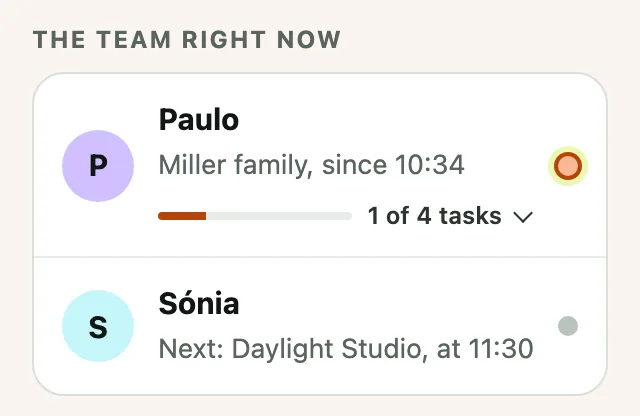
Further down, in The team right now, you see where each person is, where they go next and how many tasks they have done. Click a person to see the tasks.
-
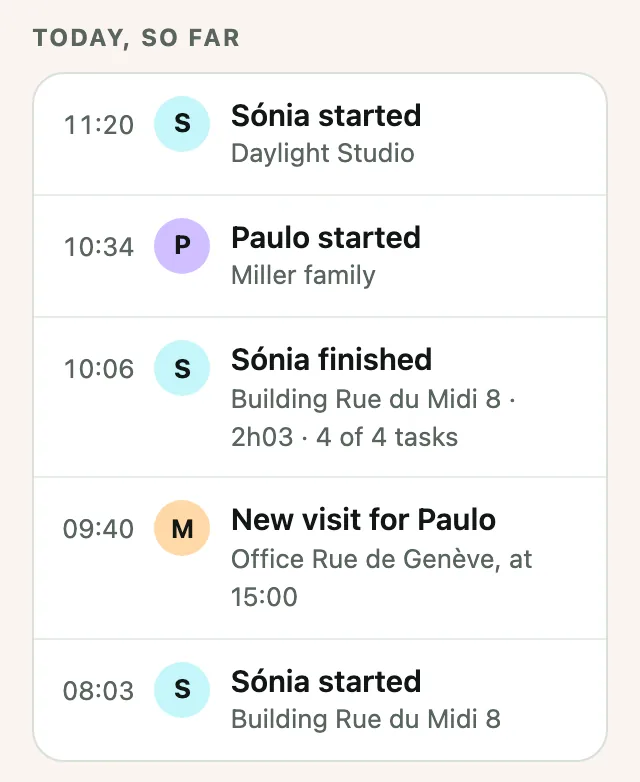
In Today, so far you see what has happened today, from the newest to the oldest: who started, who finished, the photos and the new visits. Click a line to see the hours, the photos or the visit.
-
If someone forgot to record, click + Hours by hand and enter the hours.
-
When someone in the team adds or changes hours by hand, they have to say why (if Hours by hand with a reason and a label is turned on). In Today, so far you see, for example, Sónia added hours by hand, with the client, the hours and the reason. In the lists of hours, those lines say Added by hand or Changed by hand, with the hours that were there before. Hours recorded with Start and Finish have no label.
The hours
-
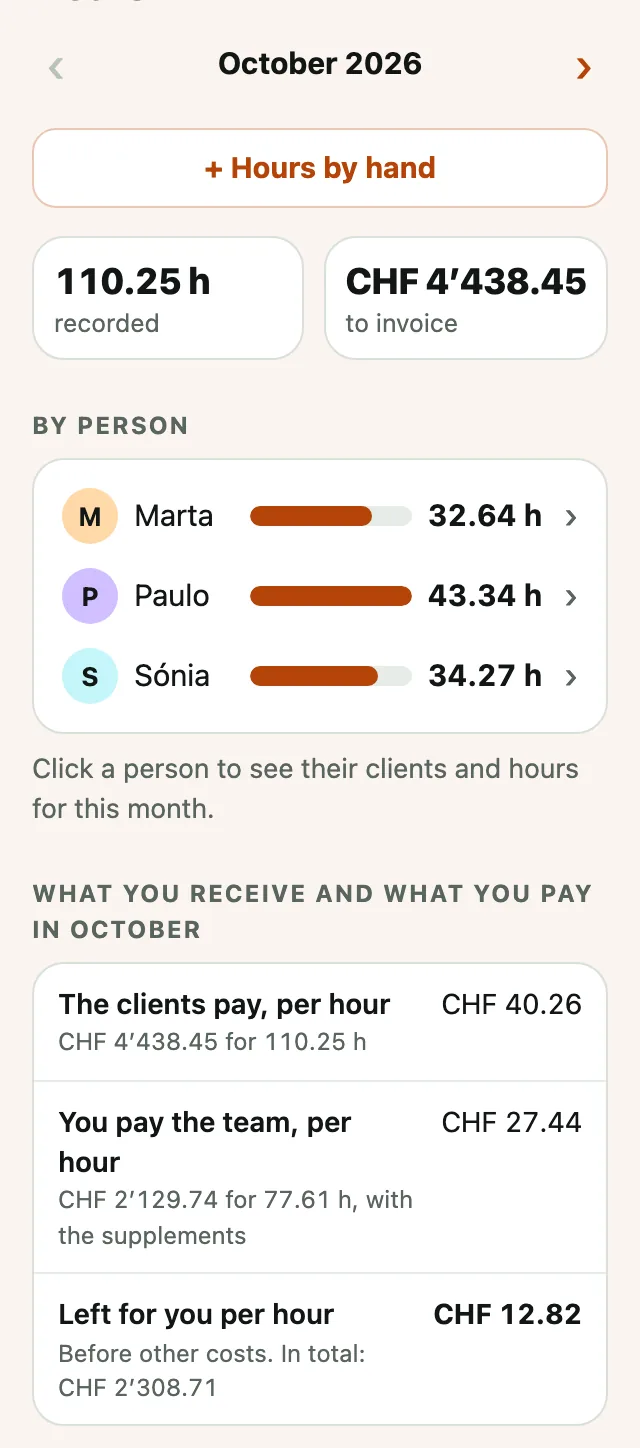
In Hours you see the month: the hours recorded, how much there is to invoice and each person's hours. With the arrows ‹ and › you go to the month before.
-
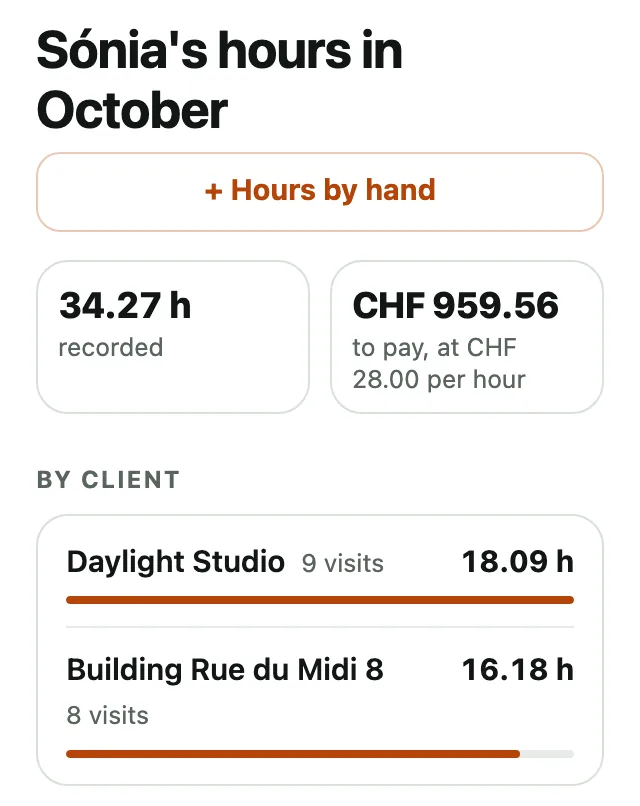
In By person, click a person to see their month: the hours, how much you pay them (if you entered their hourly pay; if not, the number of visits), the hours at each client and, in All the hours, each visit, day by day, with the total for each day. Click a visit to correct it.
If you chose in Company a day for the team's pay month to end, By person, each person's month and To pay the team count up to that day. Below By person you see, for example, ‹ 26 October to 25 November ›. With those arrows you switch between the team's pay month that has just ended (the one you are going to pay) and the new one. The rest of Hours stays by calendar month.
-
If someone in the team added or changed hours by hand, you see By hand this month below, with each person's hours.
-
In What you receive and what you pay in October (with the name of the month) you see, for the month, how much the clients pay you per hour (without VAT), how much you pay the team per hour (with the supplements, if you have them) and how much is left for you per hour, before other costs. Below Left for you per hour is the total for the month.
Only what you pay to people who have an hourly pay in their access counts. If you have not entered anyone's hourly pay yet, the app says where to enter it and shows a button for each person, for example Set Sónia's hourly pay.
-
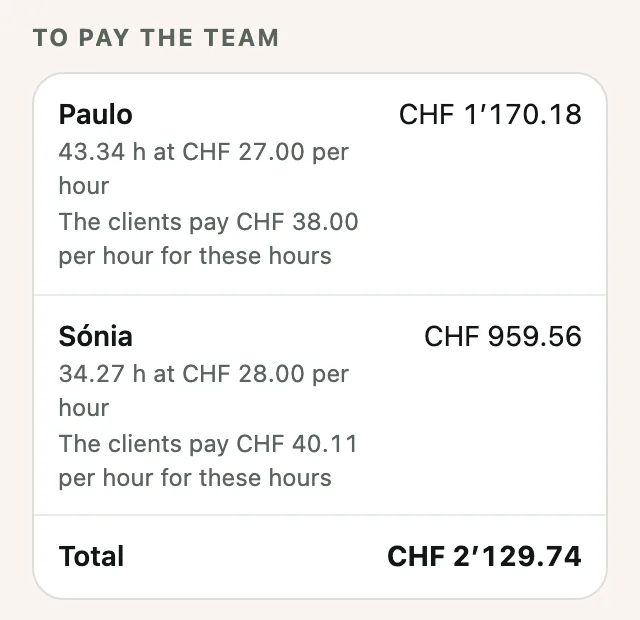
In To pay the team you see how much you have to pay each person, with the hourly pay you entered in their access, and how much the clients pay per hour for that person's hours. If you entered supplements, the amount already includes them, and below the name you see the hours with a supplement, for example With supplements: Saturday 3.00 h (+25%).
-
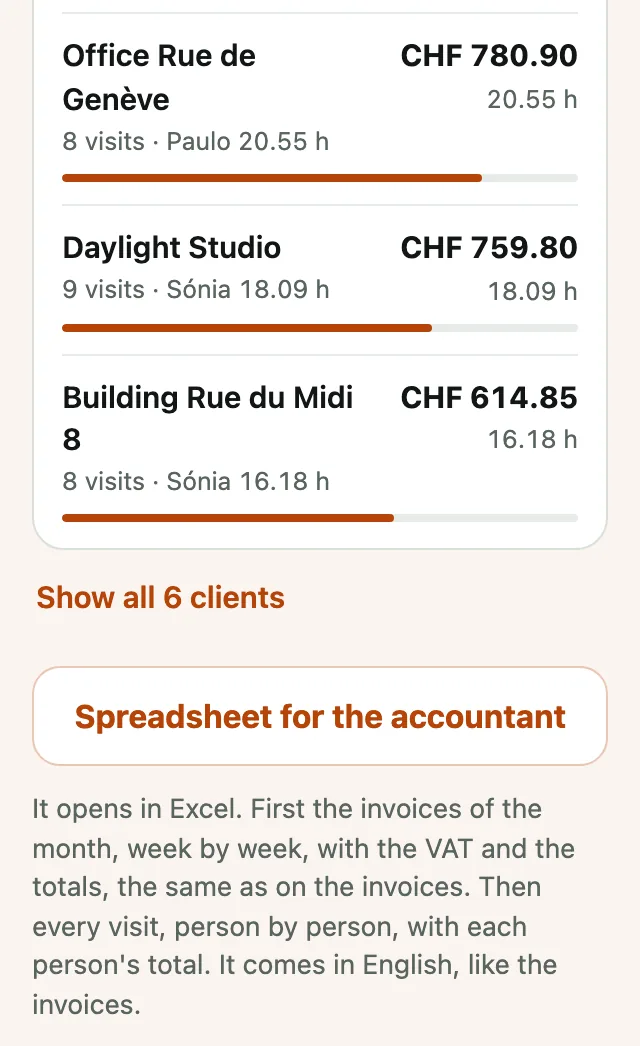
In By client are the hours and the amount for each client, first the 5 with the most hours. To see the others, click Show all 6 clients (with your number of clients). The Spreadsheet for the accountant button downloads a file that opens in Excel, with the invoices of the month and each visit. It is in the language of the invoices, or in the one you choose in Company, under Travel between clients and spreadsheet for the accountant: German, French, Italian, English or Portuguese. If there is a labour inspection, it is best to show it in the official language of your region.
-
To correct some hours, go down to All the hours and click the line. The person sees in their hours what changed, for example Marta changed this: it was 08:00-10:00.
-
At the end of the month, or on the day you chose for the team's pay month to end, each person in the team confirms their hours in the app. In the month that has ended, in Hours, you see Who confirmed the hours for October: who confirmed and when, who has not confirmed yet and whether any hours changed afterwards. Each person gets a copy of what they confirmed by email.
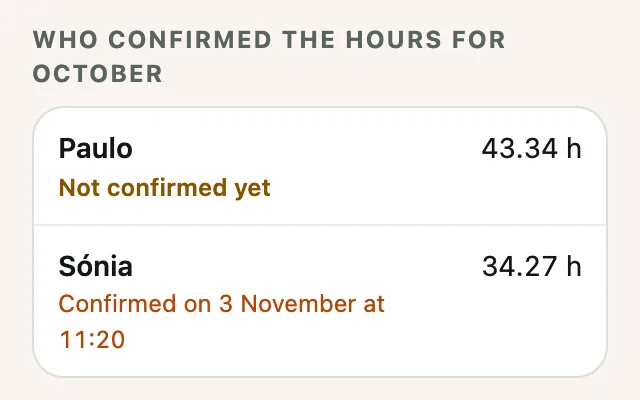
The spreadsheet for the accountant and the file with all the data also include the confirmations. In the spreadsheet, the visits are listed person by person, each with its total.
Adding hours for someone in the team
If someone in the team did not record their hours in the app, you can add them for that person.
-
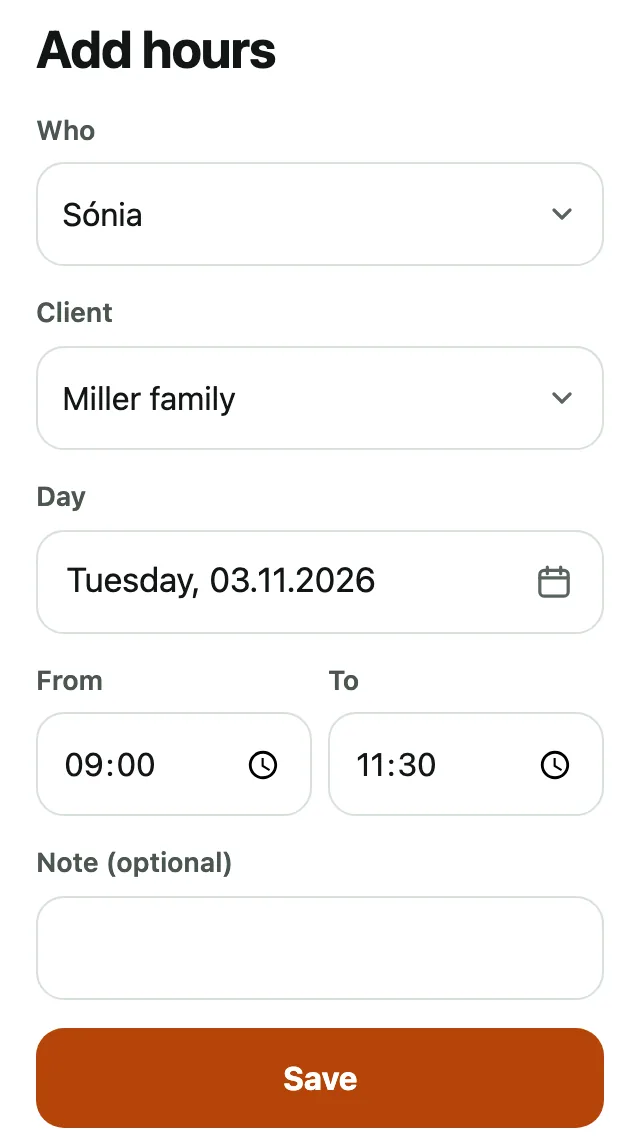
In Hours, right below the month, click + Hours by hand (or just + Add hours, if you turned off the label). The same button is at the end of Today and in each person's month, and there the person is already chosen.
-
In Who, choose the person. Then choose the client, the day (click the day to open the calendar) and the hours in From and To. The note is optional. Click Save.
-
The hours are added to that person's and that client's hours for the month. The person sees in their hours who added them, for example Marta added this visit.
The invoices
First, the company's details
-
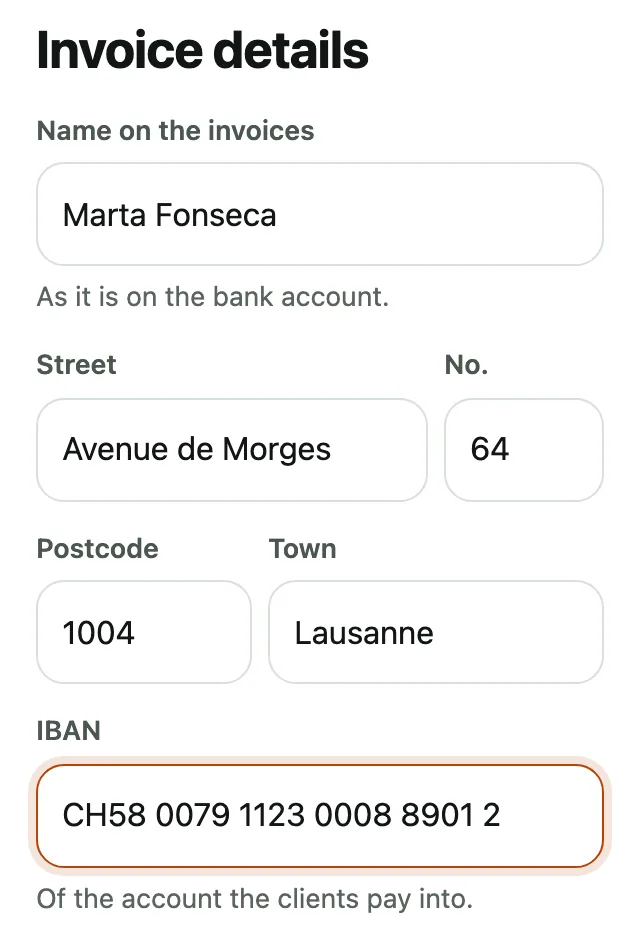
Before the first invoice, open Company and, under Invoice details, click Add the details.
-
Enter the name as it appears on the bank account, the address (street, number, postcode and town) and the IBAN of the account the clients pay into.
-
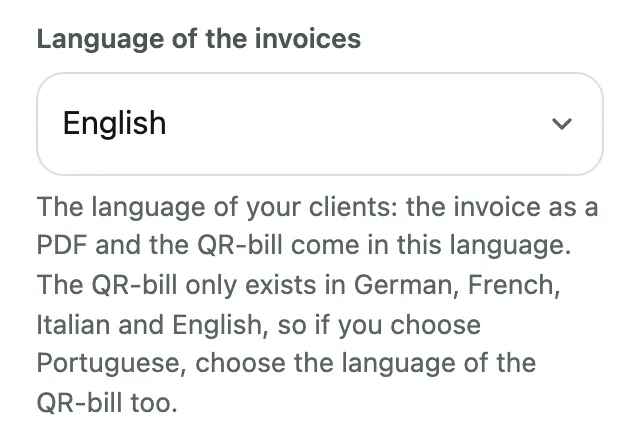
Choose the Language of the invoices, the language of your clients: German, French, Italian or English, or Portuguese with the QR‑bill in one of those languages.
-
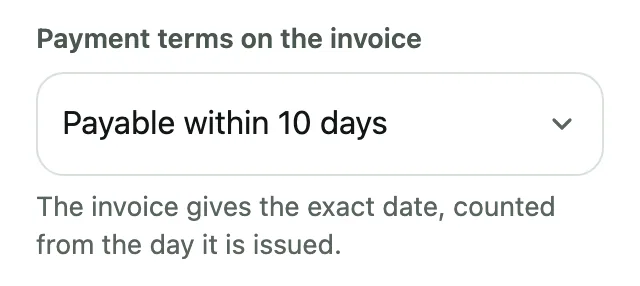
In Payment terms on the invoice, choose within how many days the client pays (10, 14, 20 or 30) or by which day of the month. The invoice writes the right date, counting from the day it goes out. Click Save.
Then, each client's invoice
-
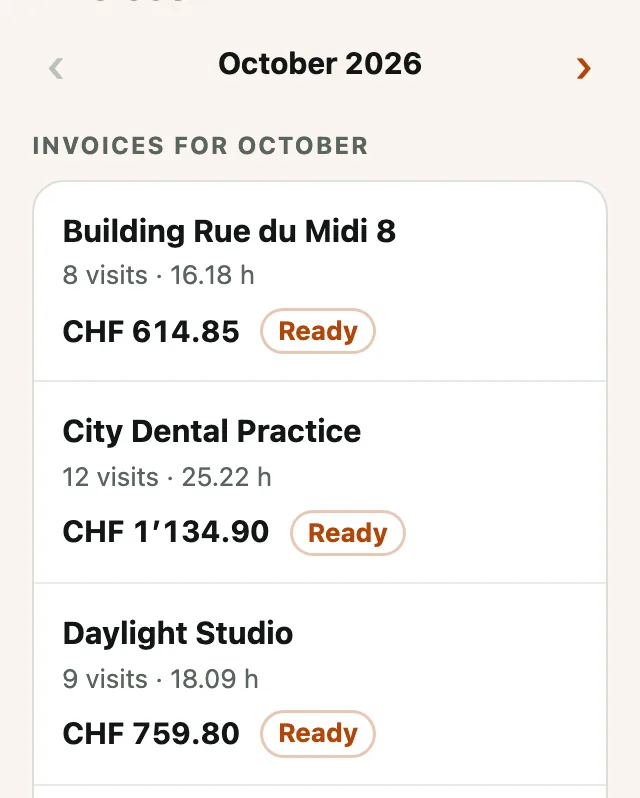
In Invoices, choose the month with the arrows. Each client with hours in that month has an invoice ready, made from the recorded hours.
-
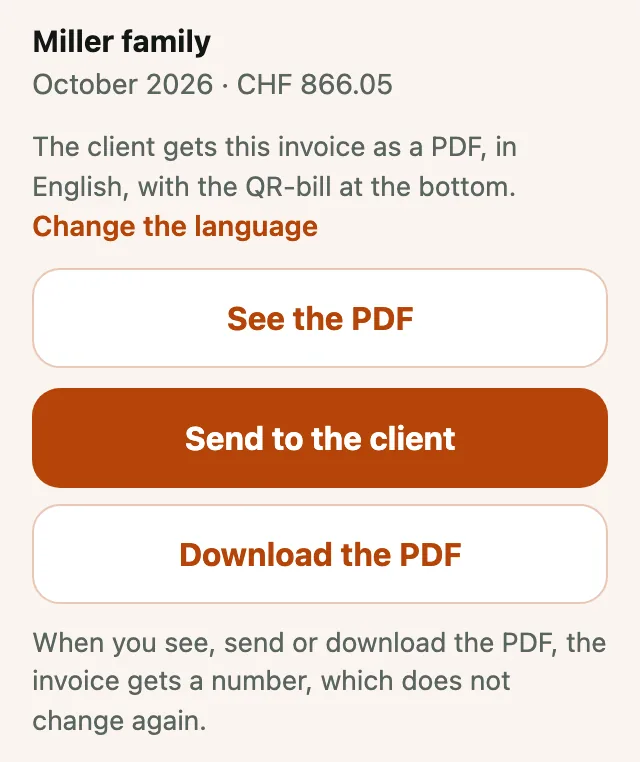
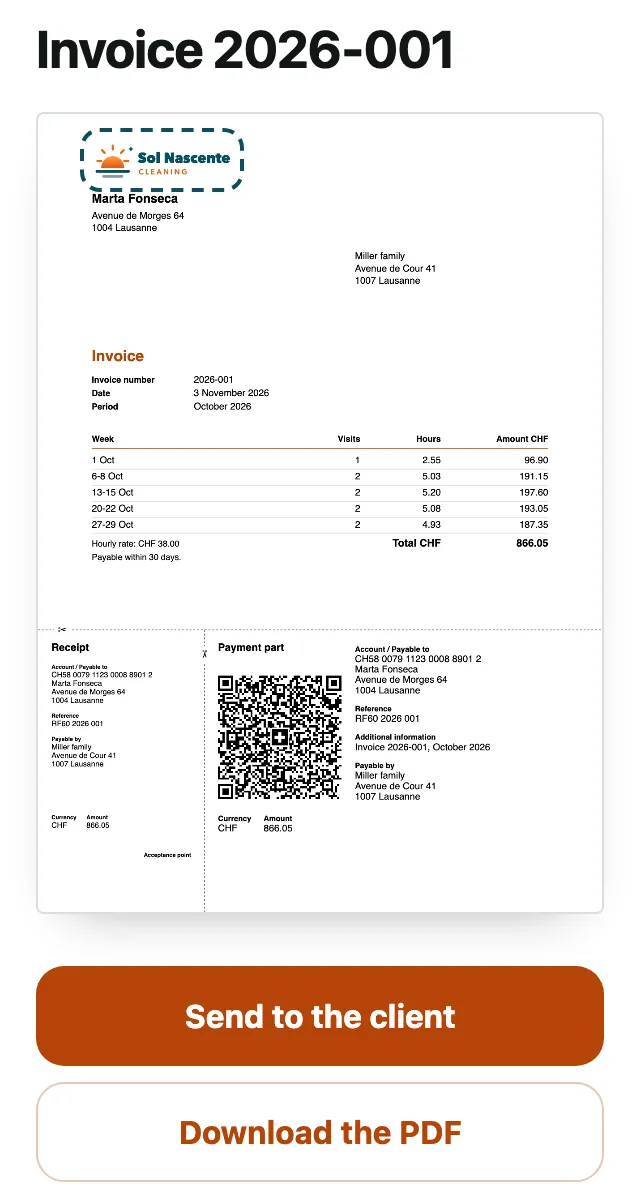
Click the client and then See the PDF, to see the invoice as the client will get it.
-
The invoice has your logo at the top (marked in the picture) and the QR‑bill at the bottom, for the client to pay.
-
Click Send to the client and choose WhatsApp or email: the invoice goes as a PDF. If the phone does not show that choice, the invoice is downloaded and you can attach it to the message.
The invoice gets a number the first time you see, send or download it. That number does not change again.
-
For a job out of the ordinary, open the invoice and, while it is unpaid, click Write this invoice's text. That text is for this invoice only.
-
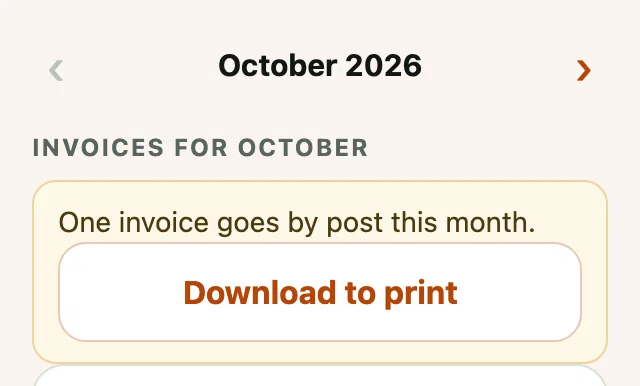
If some clients have The invoice goes by post, the app says at the top how many invoices go by post that month. Click Download to print: their invoices all come out in one PDF, to print and post.
-
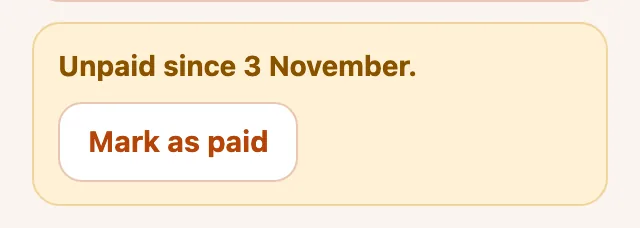
When the client has paid, open the invoice and click Mark as paid.
-
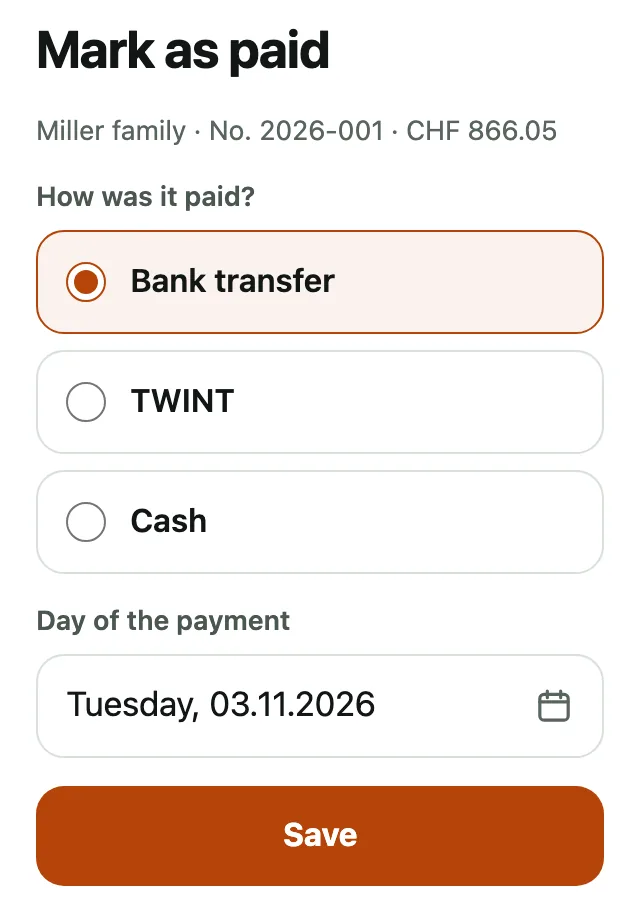
Choose how it was paid (bank transfer, TWINT or cash) and the day, and click Save. The invoices that are still to be paid, from any month, are at the top, under Unpaid.
Quotes
-
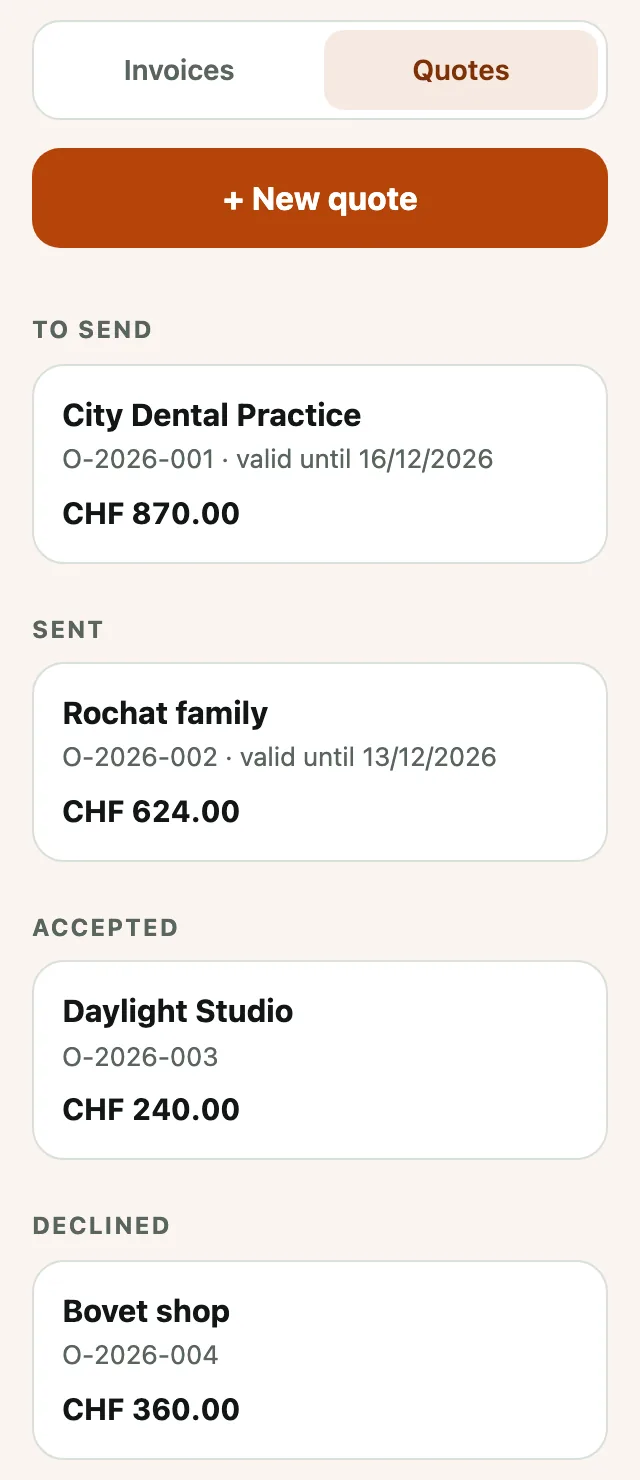
In Invoices, click Quotes at the top. Quotes are sorted by state: To send, Sent, Accepted and Declined. The team never sees them.
-
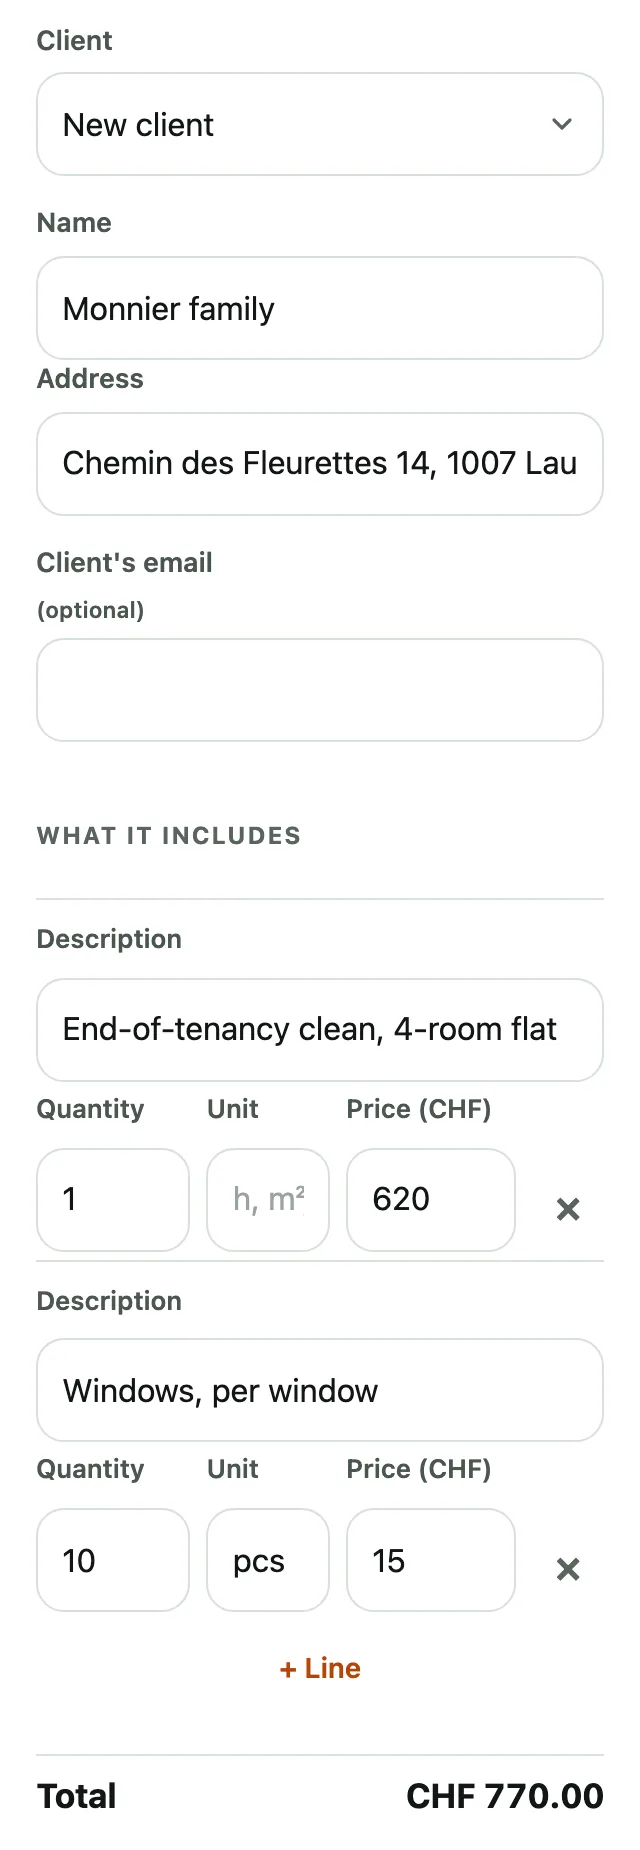
Click + New quote. In Client, choose a client you already have or New client, and write the Name and Address (and the email, if you like).
-
In What it includes, write each line: the Description, the Quantity, the Unit if you like (h, m², pcs) and the Price. Click + Line to add another. The total appears below, with VAT as on the invoices.
-
In Valid until, choose the date (30 days from today, unless you change it) and, if you like, write a Note, which appears at the end of the PDF. Click Save the quote. The quote gets its own number, for example O-2026-001, which never gets mixed up with an invoice number.
-
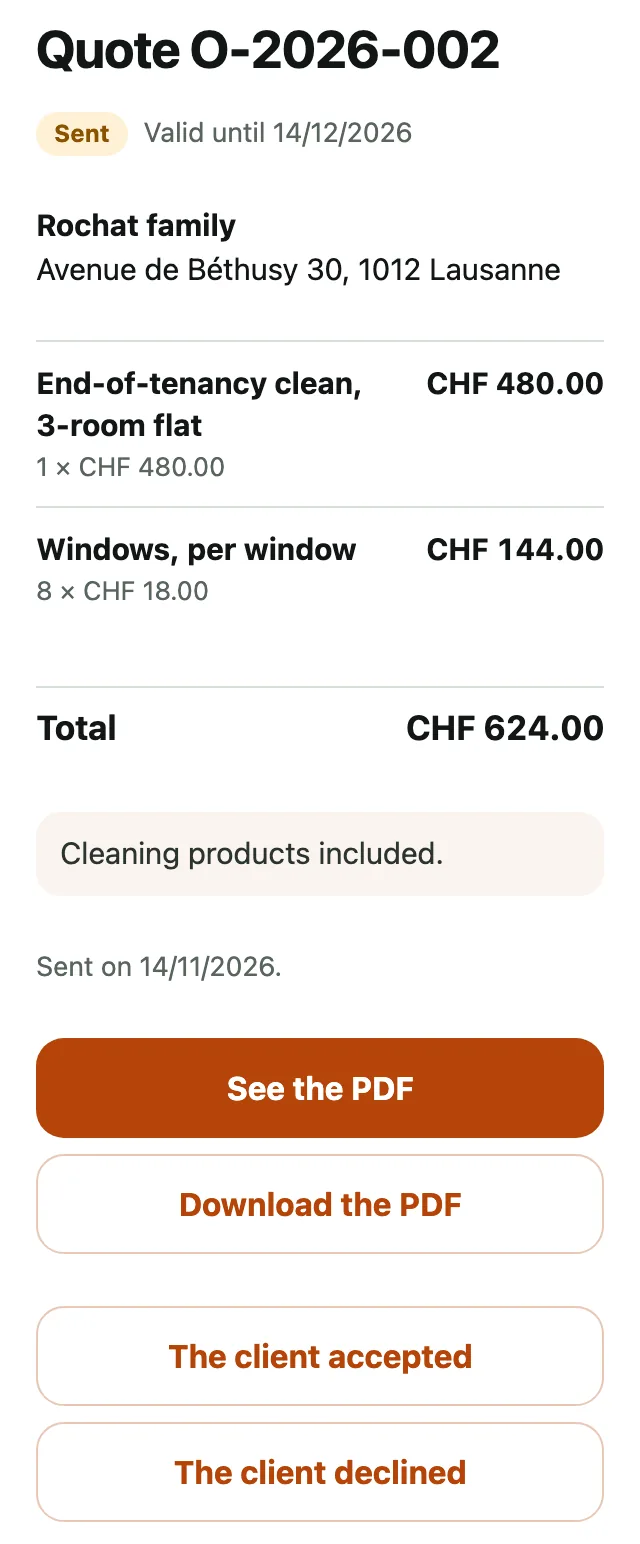
Click See the PDF, and Share the PDF to send it to the client by WhatsApp or email. On a computer, the button says Download the PDF: then attach it to your message. The PDF carries your logo and colours, in the invoices' language, without a QR-bill. Then click I've sent it. With the automatic invoices by email extra, you can also click Send by email.
-
When the client answers, open the quote and click The client accepted or The client declined.
-
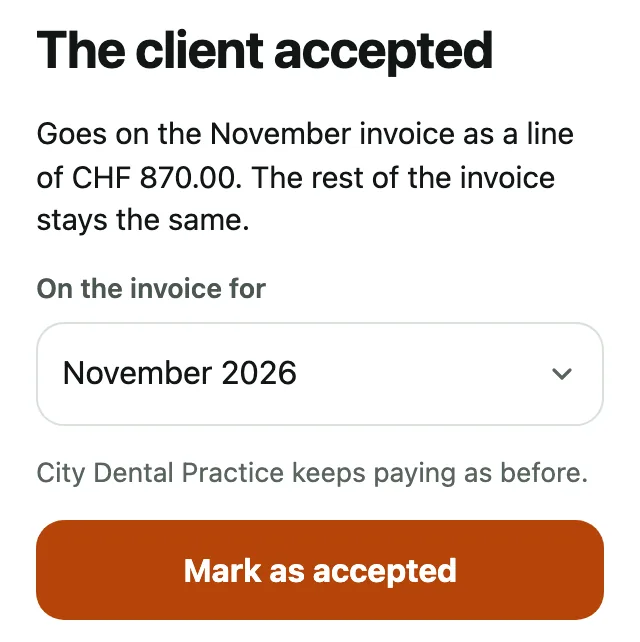
If the client already pays by the hour or a fixed price, they keep paying as before: the quote goes as a line of its own on the invoice for the month you choose in On the invoice for. If it is a new client, they then appear in the client list, with no fixed days, paying by quote (fixed price), and you add the visit in Week. Click Mark as accepted.
-
If you marked it as accepted by mistake, click Set back to sent, as long as that month's invoice hasn't gone out. In a painting company, a client's latest accepted quote is the one used in Hours against the quote on their job.
In a painting company
-
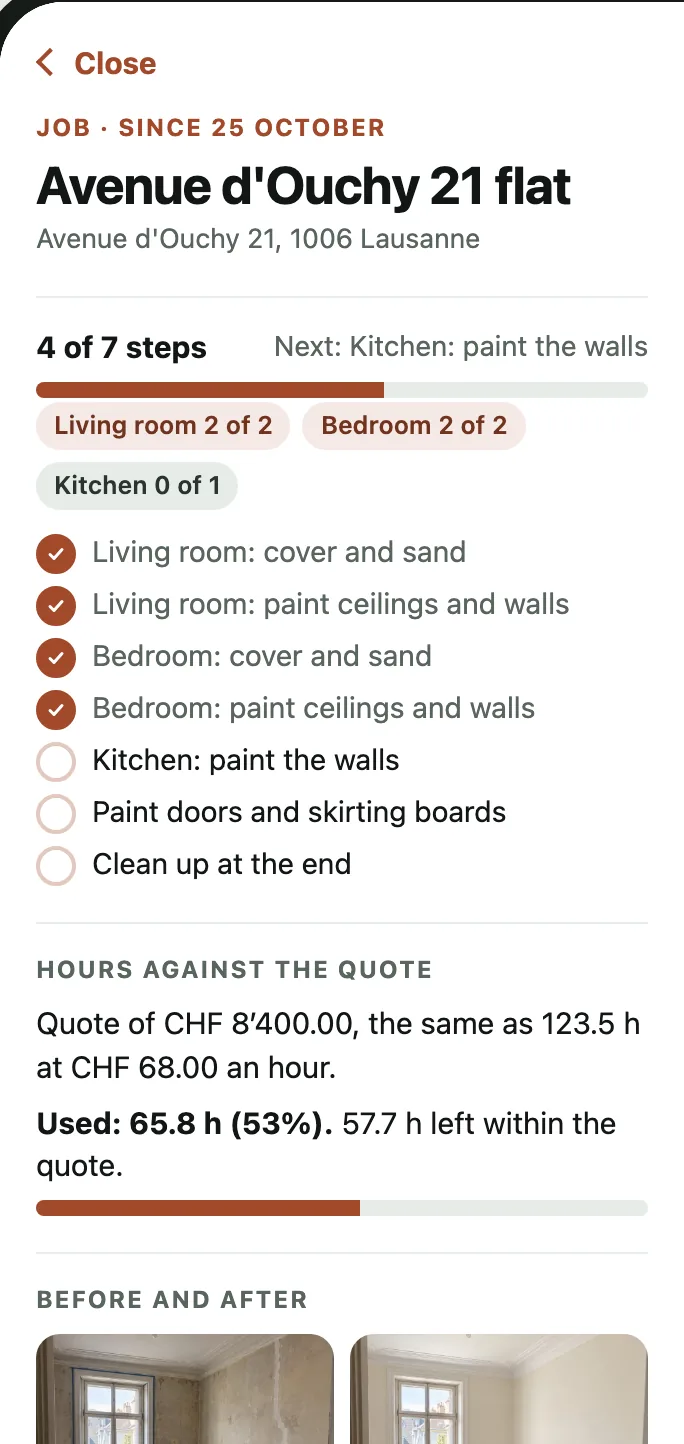
In a painting company, each client is a job. In Company, click the client to see the job: how many steps are done, room by room, and what comes next.
The steps are the tasks in the client's profile, one per line. Write the room in front if you like, for example Living room: paint the walls, and the job counts by room too. Each step is done once, even if the job takes several days.
-
In Hours against the quote, the app compares the hours spent on the job with the client's quote: how much is used, in hours and as a percentage, and how much is still within the quote. For this, the client needs an accepted quote (in Invoices, Quotes) or By quote in How the client pays. The hours are counted at the client's price per hour or, if there is none, at the company's.
-
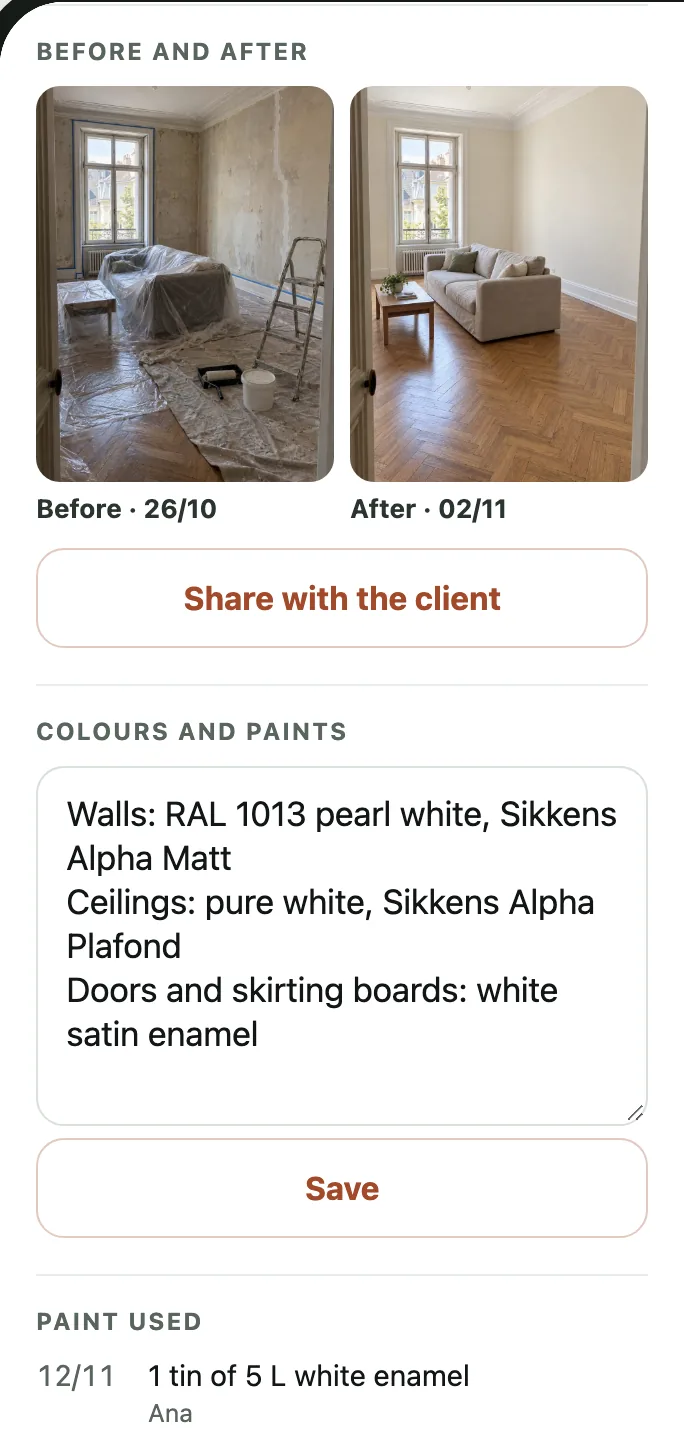
In Colours and paints, write the job's colours and paints, one per line. Whoever goes there adds in Paint used the tins and materials of each day.
-
Whoever goes to the job takes the Photo before at the start and the Photo after at the end. In Before and after, you see both side by side and can click Share with the client.
-
When the same client has a new job, click Start a new job: the steps go back to zero and the hours count from that day. The hours already done stay as they are.
Your data
-
In Company, under Your data, click Download all the data. You get a file that opens in Excel, with the company, the team, the clients, all the hours, all the invoices and the changes in the week.
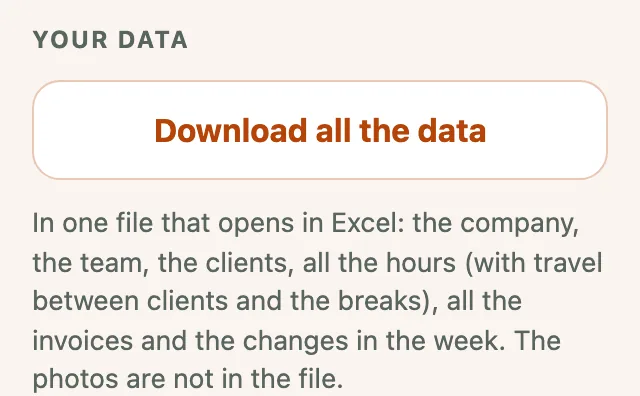
The photos are not in the file. You can download the data whenever you like. When the 14 days are over, the button is also on the screen you see then.
-
In Company, in Backup copies, you see when the last copy was made. The company's data is copied to a separate place, in Europe: every 5 minutes when something changes, and at least once an hour. Each copy is kept for up to 30 days.
If something does not work
-
Without signal, keep recording as usual. The phone keeps what you enter and sends it as soon as there is signal again. The app tells you at the top.
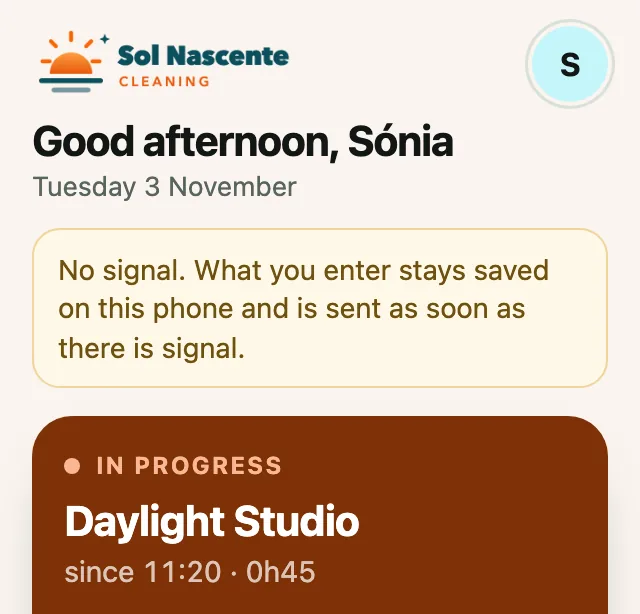
Only the photos and the number of a new invoice need signal at that moment.
-
If you have any questions, message Hugo on WhatsApp on +41 76 361 15 60 or email ajuda@pronto-apps.com. If you prefer, he can call you and set everything up with you.